
This site contains affiliate links. As an Amazon Associate, I earn a commission from qualifying purchases at no extra cost to you. Full Disclosure Here.
It is fall in the mountains of Western North Carolina and that means it is time to start thinking about that last minute putting back that needs to be done to get through the year. It is the natural prepping season around here that mountain people have been doing for a very long time.
When my husband and I were just starting out on the family property I was given, it was nothing but an overgrown piece of mountain land that you couldn’t walk around because it was just so covered in rose bushes and other briars.
This led to us wanting some livestock to help out with forging towards a future where we could see more than 10 feet from where we were standing. Enter raising pastured pigs.
The first ones we raised did not have as fatty of a diet so I didn’t render any lard but after we started getting free milk to feed our pigs, we started having hogs that had far more fat than we would ever want to put into sausage.
I rendered some lard and finally got to taste what a biscuit was mean to taste like! I also tried breading and deep frying some of the chicken we raised. That was a memorable occasion. Lard is a fabulous fat to cook with and offers a flavor unlike any other.
Before we get into the how to render lard part of the article, let’s talk about benefits.
- Lard is some of the cheapest calories out there.
I bought 60 lbs of pork fat for $1.79 per lb for a total of $110 with tax. According to several food websites, pork fat has 4,072 calories per lb.
4072 calories x 60 lbs = 244,320 calories!
244,320 calories /1800calories per day= 135.7 days worth of calories at $0.81 per day cost!
- Makes those bland beans and rice taste better and offer more complete nutrition.
Adding a spoonful of lard to your beans and rice is going to make those survival rations go down a lot better. So many preppers start out putting back some foods that are pretty bland.
How many of us eat beans and rice with just a little salt or flavor on a regular basis? If you are not into eating it now then how is it going to feel surviving on it for weeks or months? Variety helps more than you might think.
- Fat is not your complete enemy.
With the popularity of fats like margarine and various oils, lard started to get a really bad reputation. Turns out that a lot of the oily fats they told us for years were better for us were not.
There was also the fact that a lot of people simply stopped raising their own pigs over the years so lard was not a household product any longer.
Over the years dieting crazes and society in general has shunned fat as a major source of weight gain. The truth is that weight is determined largely by calories in and calories out unless you have a real medical condition.
Sure fat has more calories per ounce than other foods, but if you are keeping your calories and physical activity balanced out then fat is not your enemy.
Fats from pastured animals are simply not the same as those from commercial farms. The fat of an animal raised on grass contains higher levels of good fatty acids than conventionally produced pork.
- Fat is important to your health
While you may be thinking “Oh I get plenty of that!” the fact is that in a survival situation or long emergency, fat is important to maintaining physical condition.
You have to get some fat in your diet or you will not stay healthy. Without some fat your organs, including your brain cannot function as well.
Safety and methods:
- Rendering has some risk but it is not as unsafe as you might think.
Rendering lard is so much easier than you might think. In fact it is something you can do while doing other things. Don’t pay any attention to ridiculous stories about the dangers and hassle of rendering fat.
While any hot oil has some danger to it, with a few basic safety precautions and the right tools, there is really nothing to fear.
I am going to tell you several ways to render.
Crock Pots Have Some Advantages – 7 Quart Crock Pot
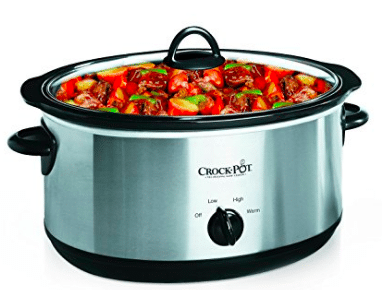
This is my first time using a Crock Pot and it has completely changed my mind about how to render lard. In the future I am just using 2 of the 7 quart standard Crock Pots and not fooling with the oven method or stove top.
Crock Pots are safer because they are not on a stove eye that can cause fires or in an oven where an overflow could also be disastrous. I was doing a lot of lard at once this time so I got in a hurry and rendered all 3 ways.
I wound up lifting heavy pots full of bubbling fat from my oven to stove top because I wanted to get through a lot. With 2 Crock Pots I could do all my lard over 3 days and it would not have been as tiring or as dangerous.
This goes to show that you learn each time you do something and that there is room for improvement regardless of experience when it comes to prepping and homesteading projects!
Cost: Check this listing here
What You Need To Get Started Rendering Lard
- Pork Fat
- Crock Pot and/or large stainless steel stock pots
- Cast iron round griddle to sit pot on to prevent burning on hot burning gas ranges. I just have a small Lodge Round griddle that I use to set mine on. If I don’t then even on low my stove is a burn risk when I am cooking things like rice or doing a project like this.
- Slotted metal spoon. Do not use plastic even if it is supposed to be okay at really high temps. You are going to be sticking this in some pretty hot oil fairly often. Plastic is too easy to forget in something. If you forget a metal spoon in your fat the worst thing that happens is you have a hot spoon to deal with.
I recommend finding a local farm that produces pork products and inquiring about a bulk purchase of pork fat. If you have a choice of several farms then check them all out and compare prices. It can vary a lot even within a small area!
Living less than half an hour from Asheville, NC means that I have some wonderful local producers of pastured pig products around me. This is the second time I have bought pork fat from the fine folks at Hickory Nut Gap Farm.
They produce a lot of different quality meats at a reasonable price. All of their animals are out on pasture and fed quality grains as needed.

This farm is family owned and operated. Pigs are raised on pasture and fed a quality diet. Their meat is highly acclaimed at area restaurants. If you are in the area you should definitely check out their farm. They regularly have special events and you can pick up a vast array of locally grown and processed foods.
The fat is vacuum sealed in bags and sold frozen. If you have never experienced frozen fat before then you should know that fat doesn’t really freeze as solid or hard as leaner meats unless it has been in a very cold freezer.
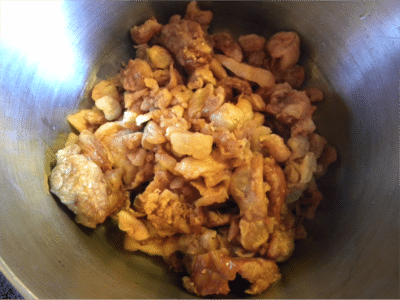
The fat I buy comes in strips or slabs normally but I have bought it already cubed. If you buy fat in slabs then you may either want to run it through a food processor or just cube it with a knife. Smaller cubes render out faster and fit in a pot better.
I did it the hard way and cut it up with a knife. I want to warn readers that you need to be very careful cutting up fat because your hands tend to get very greasy so you are at risk of your hand slipping onto your knife.
I wrapped a towel around the handle of mine after I noticed the problem. Having a towel on hand to wipe your hands on is a good idea as well.

Once you have your cubes then you can move on to putting them in pots.
When you first start doing this, it is best to be as cautious as possible as you learn. In the pictures my pots are pretty full but I was keeping a watch on things. Don’t fill your Crock Pot more than ¾ full the first time and don’t fill regular pots more than 2/3. If you follow this then if you have to move a pot there is far less chance of you splattering yourself or lifting too much weight.
The volume is going to go down as the fat renders but you definitely do not want to risk fat dripping onto your oven or stove eye. That is how you start a grease fire or at the very least an unpleasant odor in your house.
I recommend keeping a fan going for exhausting the odor or you may want to burn some incense. I don’t think pork fat smells too terrible when rendering but some may find it a bit much to deal with.
Be Patient & Keep Heat Low
Lard rendering is going to take some time. It will start to bubble lightly at some point. This is what you want. If you are going to stand and watch it you may be able to get away with a slightly higher heat or up the temperature briefly to finish off the batch towards the end.
You can gently stir the fat or move it around at any point if needed but gentle is the key word there. If there is a suction effect at the bottom of a pot it can cause it to release a bubble and you don’t want it to spatter on your hand.
A Note On Pouring Off As It Renders
You can spoon some lard off as it renders. This can actually speed things up. I definitely canned some as I went. Of course this is only really an issue if you are doing a lot at once in many pots.
For Crock Pots: When starting with cold fat I start the Crock Pot on the high setting but but turn it down to low after it starts to bubble. You can just start on low and leave it there if you have something else to do. Some Crock Pots and slow cookers have fancier timers and temp controls than mine. I just used a 7 quart oval model with low, high, and warm settings.

Over time you will start to get crispy pieces of fat. These are cracklings and they are delicious for cooking. When they are well browned you can use a slotted spoon or frying scoop to get them out. Reserve these and let cool then freeze in small quantities. They can be vacuum sealed and frozen for a longer freezer life.
A half cup of cracklings put in a frying pan and crisped further are delicious additions to corn bread. A lot of the time they have enough fat reserved in them that you do not need additional oil for your cornbread!
If your cracklings don’t seem quite crispy enough when you take them out of the rendered fat you can put them in a frying pan and crisp further before freezing. It is up to you.
If you are not into cracklings then you can always freeze them for dog treats. As I write this our dogs are outside waiting to see if we will toss them one.
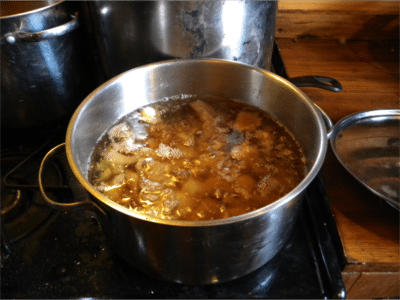
The Oven Method
The first rendering I ever did was using my oven and it is very slow but if you only fill pots ½ or 2/3 full and leave them in the oven on 200 degrees you can render. I did this briefly with a few pots with this batch of lard but then moved them to the stove top because it was taking a long time.
It is not a bad method but be prepared for it to take a full 12-18 hours if your pots are big. The Crock Pot Method is much more efficient.
If you are rendering in the winter when it is cold then the oven method is more practical because it can help keep the house warm too!
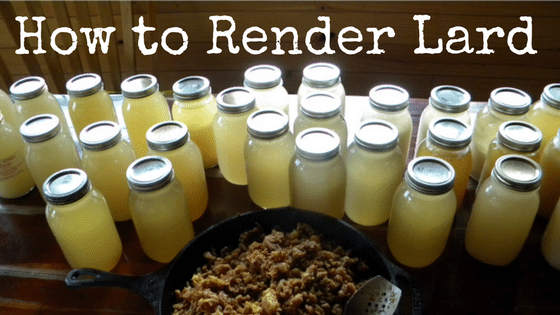
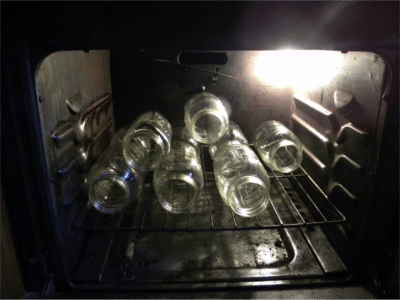
Clean Jars Are A Must
Make sure to inspect jars for cracks and imperfections. Wash jars well and put in a 250 degree oven for 10 minutes or so to make sure they are dry and sterile.
You will need to use a jar lifter or mitt to lift them out and place on a heat proof surface that is not really cold. I use an old towel. Rings and lids should be clean and dry too.
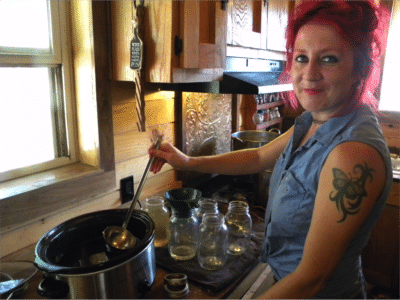
Carefully ladle hot lard into jars. It should be warm but not boiling. I use a jar funnel. The one I have is plastic but made for canning. I plan on upgrading to a metal one as soon as I can just because I know this plastic one is not going to last forever.
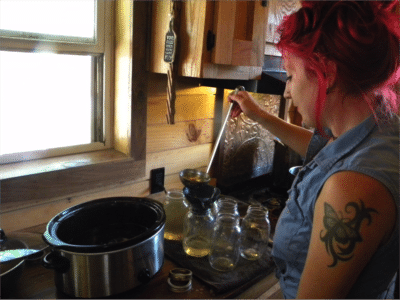
Try to avoid getting any on the rim. The funnel can help with this. You want to pour until you have a small head space. I try for filling as much as possible.
There may be some air bubbles. They have never caused me any trouble but sometimes I will try to pop them if there are a lot or let them settle for a minute before putting on the lids.
Put lids and rings on as soon as you can without burning yourself. After this you just need to let jars cool naturally and check back in 24 hours to make sure they sealed. If a jar does not seal then you can scoop out lard reheat it and put it in a new jar or refrigerate and use is over the next few weeks.
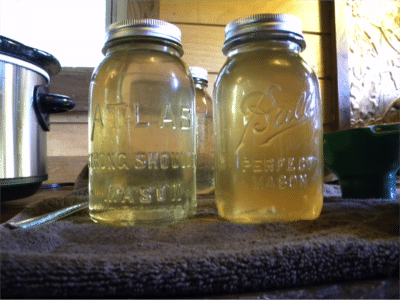
I would never put my Atlas Strong Shoulder Mason Jar in a pressure canner! I am pretty sure it is many decades older than I am. My grandma canned in it.
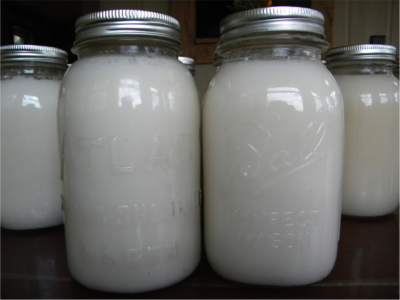
The Results

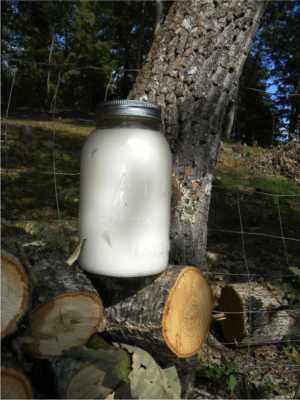
Lard has to be completely cool before you get that classic solid milky white color.
Shelf Life
If kept sealed and cool lard will keep for 5 years easily. It may even last longer but I don’t want to make any promises because conditions that it is stored in are going to be the determining factor as well as the cleanliness of your jars at the time of canning. Sometimes a jar can become unsealed and then seal back which can result in faster spoilage.
Like any canned good, it is a good idea to use some and then can some every so often to replace what you have used.
I usually just use a Sharpie and write on the lid so I always know the date. The Sharpie seems to last and stay visible for years even under no so great storage conditions.
Recipes Where Lard Is A Good Choice For Fat
- Biscuits
- Meat Pie Pastries
- Deep Frying. If you haven’t had chicken breaded and deep fried in lard then you are missing out!
- Add To Rice & Beans
- Pan Frying
Recipes For Cracklings
- Cornbread
- Adding To Vegetables Like Green Beans. You can lightly refry cracklings and use them on top of a green bean casserole in addition or in place of deep fried onions
- Add to Latin and Mexican Food Recipes For Additional Flavor
- Refried and eaten with wilted greens
Lard Rendering Can Be Fit Into Your Schedule
While I decided to do all my rendering at once, there is no reason why you cannot just keep fat frozen and render 10 lbs at a time. Using a 7 quart Crock Pot will give you about 5 quarts of lard and some cracklings in each batch. That means over a 5 day work week you can put back almost the same amount I did.
You can always render it over night if you are not comfortable leaving a Crock Pot with oil in it while you are gone. Some slow cookers have timers and I think there may even be Smart Crock Pots that allow you to control them remotely while away!
On the other hand, it was good to just get all my lard put back at once. It will be a long time before I need to do it again. In about 24 hours, I put back over 200K calories and you can too!
Do you have any favorite recipes for using lard or cracklings? Please share with us! I would be glad to answer any questions you might have about rendering so feel free to ask away in the comment sections below!
Wishing you and your family a great fall filled with good food and memories!
Author Bio:
Samantha Biggers lives on a mountain in North Carolina with her husband and pack of loyal hounds in a house her husband and she built themselves. When not writing she is working in their vineyard, raising Shetland sheep, or helping her husband with whatever the farm and vineyard can throw at them.
If you enjoyed this article, consider following our Facebook page.


12 Responses to “How to Render Lard”
My favorite way to use the cracklings is to leave a little bit of hot fat in the kettle of fat pieces, stir in some mixed bird seed and then pour it into a cookie sheet lined with waxed paper. I slide it into the freezer till firm then lift it out by the corners and place it on the countertop. Using a large knife, I carefully cut it into suet blocks. I keep them in a Ziploc bag in the freezer so they don’t get messy and soft. Presto! Free high protein suet cakes for feeding birds. I don’t have chickens, but it sounds like a good treat for them too.
Loved the article as I have all of the ones that I have read from you! Going to try rendering my own lard soon as I have a hog farmer close by that is retiring the first of July. This is something I have recently become interested in as times are uncertain and prices going up in stores! Any idea how long cracklin’s will last not frozen and have you made your own pork skins?
Thank you so very much for this wonderful and informational article post and recipe. I appreciate the tips and look forward to canning lard this year. Especially w/ hunting season & the need for pork fat to mix in and having it handy certainly makes it worth while. I love the idea of using the crock pot & being a busy mom of 2 I’m finally discovering how handy the crock pot is. Applesauce done that way turned out great this year too. And the comment of making suet bird feeders was an amazing idea for our feathered friends for winter. God bless you and your family too. Happy Canning always! – Jessica Frye
After dipping out as much hot lard as I can, I pour the hot cracklings out on a large cookie sheet lined with parchment paper and add several cups of mixed bird seed. I press it down to make a solid cake, then put it in the freezer until hard. I take the pan out and lift out the frozen cake by the paper edges. That allows me to work with it on the kitchen counter. With a large knife, I carefully cut it into four inch squares that will fit into a suet feeder for the birds through the winter. They love it and I usually get enough to pay me back for the price of the fat by not having to buy suet cakes at a dollar or more each. Its like buying suet and getting all the lard for free!
What an outstanding article.. So many Survival related sites are just touting so much nonsense.. This is real information real people can use..
Loved the article! When I was growing up, rendering lard was part of my job when the family got together in the Fall and butchered hogs. One of the advantages of helping with that was getting to eat the fresh cracklings! 🙂 I love the idea o using the crock pot! Two years ago I started doing my apple butter in a crock pot. It’s so easy, and allows me to do other things while my apples are cooking.
My late husband and I raised our boys in the Asheville area. That is surely God’s Country!!! I miss being there, and love when I visit my family that’s still there, in the Brevard and Asheville area.
After my late husband’s death, I eventually remarried, and I’m the wife of a real chuckwagon cook, who’s also Santa! We drive from TX every year to spend Nov-Dec at Dollywood as Santa and Mrs. Claus.
I love all the skills I’ve learned since my chuckwagon cook! I can just about cook anything over a fire in a Dutch oven that I can cook in my regular oven. I feel blessed that I’ve gained so many skills in my lifetime that allow me to live without depending on so many things that most of us can’t live without. When most people were in such a panic after hurricane Harvey hit us here in TX, we were fairly comfortable without electricity, and we didn’t have to make any mad dashes to the store in town prior to it, for supplies. One advantage that we have is that we live on a river.
Thanks so much for a great article!
Good article. Lard is available in #10 cans in most Mexican grocery stores. How long do you suppose a can of lard can last on the shelf and be safe to use?
I plan on at least 5 years out of lard kept at non extreme temps.60-70 average is what I am thinking . I have kept it for years and it still be good. Like any canned product it is best to rotate out old with new so if you replace some as you use it that would be ideal. The good thing about canned fats is that it is super easy to tell if something is turned. Bad fat stinks like crazy and sometimes you will see mold. If it smells good and there is no mold then I consider it safe to eat when it comes to fats. I am not saying I would eat older fat straight out of the jar lol but I would be fine cooking with it if it smells and looks okay. Now if you have a damp basement and you are storing fat, you may have a reduced shelf life. Moisture can be hard on canning jar lids and rings. Some folks may have different standards when it comes to this but I have been at it for quite a few years and never been sick from anything canned. So far so good! Thanks for reading!
I have a 6-quart crockpot that I use mainly for rendering lard and tallow. Cream gravy made with tallow is awesome!
Do you have a recipe?
Thank you! I have been very interested in this for awhile. I want to use this fat to make pemmican.
Great article! Thanks so much!