

This site contains affiliate links. As an Amazon Associate, I earn a commission from qualifying purchases at no extra cost to you. Full Disclosure Here.
It is that time of the year. Firewood, woodstoves, and chimneys start to need some attention if they are to be used safely or effectively to heat your home or business during the cold months.
Inspect your stove
Even if you remember your stove working just great last year, you should inspect it for any damages or excessive rust
I have repainted our stove one time since we got it in 2010. Some stoves are painted, and some are not. Be sure your stove is painted before you go putting on a layer.
One very important step to never neglect is to use steel wool or sandpaper of very extra fine grit. A wire brush can work too. Rust will cause the paint to not go on smoothly and flake off.
Look for cracks in the surface of the stove. Minor cracks can be repaired and stopped from creating a worse problem. Simply fill in these imperfections with furnace cement. Any place that sells stoves likely has something that is made for this.
Check for blockages anywhere in your chimney
Birds are notorious for building nests in chimneys. Even if you have a cap on your chimney, smaller birds can take up residence or even become trapped! We have taken down some of our stove pipes to release small birds that got trapped in the warmer months.
We just take a section of pipe out and check while cleaning, this takes us to the related step below.
Cleaning for the coming winter can get to be a lot. I had some ashes to deal with in the stove. Oh and we had to tip the stove over because of something I did. I made the mistake of putting makeup down on the stove during the summer and a tube of mascara rolled back into the welded on the back panel. I was very embarrassed. I got the firebrick and everything out and we used a hand truck to tilt it back. I will never sit anything small like that on the stove again!
Check for creosote in your chimney
I have recently learned the degrees of creosote that can build up in your chimney and stove.
1st-degree creosote
This can be removed with a brush with ease. It is black and very powdery. It may take a couple of sweeps to remove most of it. You don’t have to get every speck to safely use your chimney.
2nd-degree creosote
This is harder to remove but still a bit powdery. If you have a glass front stove or fireplace insert, then you will see this build up on the glass.
Cleaning Tip For Glass Fronts
When Matt and I built this house, we had to follow a lot of rules to put a wood stove in it. There is a reason why people wait until after the inspector is gone. We had to use several layers of fire protection and then we decided to make it pretty. I loved the look of a fireplace, but I agreed with Matt that it made no sense because you lose so much heat. We settled on a glass fronted wood stove. The problem with glass is that low burning fires or just burning a lot of wood leads to creosote build-up that is hard to clean with conventional cleaners. I bought the glass cleaner that they sell at Lowes for stoves, and it took forever to get anywhere. I was starting to think that there was not much point in a glass front stove if you could barely see through it! The game changer was discovering where someone used wood ashes to clean their glass!
Now all I do is get some ashes out of the stove when not in use, of course, wet them with water and use this to scrub the glass. It removes that creosote in hardly any time at all and without scrubbing extremely hard. I like the fact that it is a free by-product of the whole woodburning process. The cleaner I was buying was over $5 and didn’t go very far or work well. The wood ash method also works well for glass front ovens that are grimy. I suppose it is the lye in it that makes it work so well.
3rd-degree Creosote
This is creosote that has taken on a liquid-like form. It resembles black tar that has run down the inside and sometimes the outside of a chimney. This is a big problem that is a lot of work to remove. Plenty of people call in a professional for this type of removal, especially if the chimney is very large.
If you move into an older home or one with a large chimney just remember that if you ever want to use it, then it is not worth risking it without checking it out and having it cleaned if it looks terrible. A chimney fire is a tragedy that can be prevented with good maintenance. After a good solid cleaning, you can maintain the chimney with less intense means like using a brush yourself once a year.
Chimney cleaning services ensure you don’t miss something critical to your safety when you buy an older place with a chimney that appears to have little maintenance performed on it over the years. There can be cracks and other issues that are simple to fix but hard or impossible for you to see.
A chimney brush is something anyone with a wood stove should have. They are inexpensive and can take care of most of the chimney maintenance if used regularly.
List of things that causes build up in your stove or chimney
There are some things to keep in mind if you are trying to avoid excessive build-up in your chimney. There are also some chimneys that are just made in a way where you are going to have more build up over the years too. Anything you can do to reduce it will decrease how often you have to clean your chimney.
Burning green or unseasoned wood
Low-intensity fires burned more often than very hot fires. Low smokey fires mean more build up.
A large chimney or flue.
While most woodstoves have a 6-12″ chimney, some old fireplaces and homemade chimneys could be 24″ or more at least at the bottom. A large area like this leads to building up and since it is a large chimney people forget to check it because they think a larger opening is going to have less build up.
Elbows and Bends
A straight chimney with no elbows or bends doesn’t accumulate as much creosote as fast as one that has even one elbow. Any angles are going to be harder to clean too. It is something you just have to deal with if you have that style of a chimney and don’t want to redo it or can’t.
Kindling and starters to have on hand.
It is a good idea to split a bunch of kindling and have it on hand for getting fires going. I have seen fatwood being sold, and I am sure it is great, but a lot of people don’t want to pay that much for little sticks of wood. We have a bunch of old milk crates that work great for storing small kindling. It is nice to be ahead on that, so when the weather is particularly foul, you can be toasty with little hassle.
For extra fire-starting power, you can dip small kindling in soy or paraffin wax. Sassafras is something that we have a lot of around here, and its oiliness is great for firestarters!
For those times when we want to get a fire going fast, we get these amazing little blocks of firestarter that are soaked in vegetable oil. They cost a few bucks, and you get 72 of them. That is not much for the convenience of being able to start 70 fires without struggling. The carton says to use 2-3 of them, but you can get a good fire going with 1 and never need more than two even if you are not paying good attention to your fire. Our name for them is fire biscuits!
Check your firewood supply and get any last minute wood that you need.

Matt has been cleared out near the property line last year. It provided some excellent firewood. The area was just a bunch of old pines and other stunted trees. I have put in some time stacking and helping burn as the conditions permit. We hope it will be pasture one day. The sheep do help but the fact that this was a pine thicket means it could use some help. We burned a lot of brushfires here so that will help with new growth. Clearing this also resulted in some extra firewood for the year since it was not entirely pine.

If you have a woodlot or somewhere that you have permission to gather firewood then now is the time to supplement what you have already bought or gathered. Don’t underestimate how much you need. If the wood is sound and hardwood, then you can keep it covered and use it the following year if you don’t burn it all now.
If you buy your firewood, then get your order in, especially if they have a thriving business. A hard winter could mean higher prices later on.
This whole pet sheep thing means she wants to be in the middle of everything.
Check out your splitting mauls, axes, and wedges.
It is easy to forget that your maul is in terrible shape during the warm months. Now is the time to look over your wood splitting outfit. Remember safety glasses if you are using metal splitting wedges. Getting a piece of metal in your eye is awful. I don’t wear safety glasses when doing regular splitting even though I probably should, but you can bet I take the time with metal wedges being added to the equation.
If maul handles are looking rough, then you should go ahead and buy a replacement handle to have on hand when it finally breaks. It may last longer than you expect but you will eventually run out of luck.
Metal splitting edges tend to last forever, but the plastic ones don’t last that long here. Plastic is great because it doesn’t send metal shards flying or ruin a chainsaw chain if it accidentally gets hit with one. The downside is that plastic is just not as durable and honestly the plastic is not cheap.
Put your chainsaw away in good working order
It is very annoying to go back to using a tool that was not serviced or fixed at the end of a season. For most people, firewood is the last project unless they have to cut up a downed tree due to a winter storm. You don’t want your saw not working well if that happens.
Clean, sharpen, lube, etc. so when you pick it up again, it is good to go for the year to come. If your chain is close to shot, then you should consider just replacing now and starting fresh for the season.
Always use up or drain out any old fuel if you are not going to be using your saw for an extended period.
Make sure you have a bottle of gas mix for next season or next use. For those that just want major convenience, there is the option of putting back a can of True Fuel since it is so shelf stable.
Fire extinguishers
Every house should have a few fire extinguishers. If you have a wood stove, it is a good idea to keep one nearby. Chimney fires are the most common reason for wood heat leading to house fires, and since you can prevent that by keeping your chimney clean, the likelihood of a house fire from wood heat is low. A fire extinguisher is a good precaution regardless.
If you have a single main fire extinguisher, you may want to consider some of the smaller can style fire extinguishers. They are easy to buy and very space efficient.
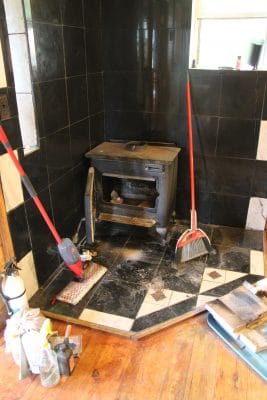
Fire protection around your stove
We had to go a bit overboard on fire protection, but at the same time, it is better to know that it is overdone then not protected enough. A tile or stone hearth is a traditional way to do it. You can get inexpensive tile at Lowes for $1 or so a square foot. Now you have to put a concrete board behind that but it is still inexpensive, and you can always buy a few accent tiles to make it look pretty.
Our hearth is granite and tile. I think the whole project counting all the underlayments and metal spacer framework we were forced to do, came in at around $600. Prices haven’t gone up that much on the materials we used. It was about $1,800 for the chimney, stove, and hearth construction. $1,200 of that was the stove and chimney. Building a chimney from scratch is not cheap even if you do just a basic straight pipe up through the roof as we did. I say this just to point out that getting started with wood heat is not the cheapest endeavor in a cabin with a loft.
Some people if they were very careful could get a new stove and put up a chimney for $1,000+, but it would be a small newer stove with a fireproof matt to set it on, and a basic chimney that is not very tall. Sure you can buy used wood stoves but that honestly saves only a few hundred dollars, and from looking at those available, there are a lot of expensive ones for sale second hand. It is hard to find a smaller wood stove used. Lowes has small stoves for around $500-$700 new, so you have to compare that to your used price.
What are you doing to get your stove ready for the cold months? Anyone find anything interesting in their chimney this year? So far we have not had any birds flying down it or anything so not as eventful as last year.

Cell phone image of my hearth awaiting a truly cold night. Matt cut up a bunch of kindling so we are ready!
Samantha Biggers can be reached at [email protected].
Need more help with pre-winter preparation? Get BackdoorSurvival LIFELINE!


3 Responses to “Firewood, Woodstove, and Chimney Prep For The Coming Winter”
Yup I clean the chimney and free standing fireplace bout this time every year. I’m just now getting into wood cutting season. The cooler temps help with the poison oak/ivy and the cooler temps help with my work rate.
Burning green wood makes it tough. You shouldn’t even see a smoke signature. If you will burn seasoned wood you have little issue cleaning the chimney and it’s more of an inspection than anything.
There’s no overboard when it comes to protecting your place from open flames. There’s it burned down or never had an issue.
We can look for at least one bird in the stove pipe every spring! Usually it’s a bluebird. We have fastened the stove pipe in such a way that it is easy to take loose at the eave of the roof and tilt it enough so that the bird can escape. They really make a racket when they realize they picked a nesting spot that was not so good!
Almost all of this is a good read. The parts that EVERYONE says burn wood in the same year as you cut is dead wrong. If you get ANY black build up in your flue the wood is still GREEN not seasoned. Some woods can be burned in one year AFTER it is split and stacked OFF the ground are soft maple , cotton wood, ash, pine poplar and a couple more– mine is split and stacked for 2 years before it sees a stove. ALL my hard woods like oak, hickory, locust[black and honey] ,hackberry, elm and a few more needs at least 3 years on a average split– mine sets 4-5 years before it is used. Why I do this? When I clean my chimney every other year all I get is about a cup to 2 cups of gray powder. Any black in your chimney your wood is NOT seasoned right, no matter the wood hard or soft.