
This site contains affiliate links. As an Amazon Associate, I earn a commission from qualifying purchases at no extra cost to you. Full Disclosure Here.
A couple of weeks ago I wrote about using worms to create compost. The official term for this is “Vermicomposting” and the great thing about it is that it is clean and tidy and does not take up a lot of space. For folks that have small yards or live in apartments, this is ideal plus, if need be, vermicomposting can even be done indoors. Imagine composting in on your porch, a deck or even in your laundry room!
Now that I have you excited about composting with worms – and specifically red worms – I would like to provide you with instructions for building the cheapest worm bin imaginable. It is built out of commonly available supplies and is so easy even a novice handyman (handyperson?) can do it.
THE CHEAP AND EASY WORM BIN
Here are the materials you will need to build your worm bin.
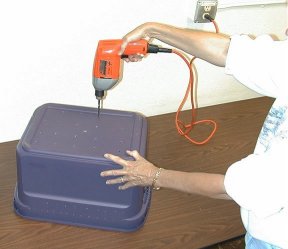
Two 8 to 10 gallon plastic storage bins
Drill (with 1/4″ and 1/16″ bits) for making drainage and ventilation holes
Newspaper
About one pound of red wiggler worms
The bins should be opaque and not clear. This is because worms like to live in the dark and will not thrive if there is any light coming into their home. Also, although you could use larger bins, they will be too doggone heavy to lift once they are full of nicely composted worm castings. Stick with the smaller 8 to 10 gallon size. 1. Drill about twenty evenly spaced 1/4 inch holes in the bottom of each bin. These holes will provide drainage and allow the worms to crawl into the second bin when you are ready to harvest the castings.

2. Drill ventilation holes about 1 – 1 ½ inches apart on each side of the bin near the top edge using the 1/16 inch bit. Also drill about 30 small holes in the top of one of the lids.

Note: You are going to need to build two bins although in the beginning, only one will be used.
3. Prepare some nice bedding for the worms by shredding some newspaper into 1 inch strips. Worms need bedding that is moist but not soggy.

Moisten the newspaper by soaking it in water and then squeezing out the excess water. Easier still, fill a spray bottle with water and spritz the shredded newspaper until it is nice and damp. This might take awhile because you will want to fluff it up as you go but it will prevent the worm bedding from getting too soggy.
4. Cover the bottom of the bin with 3 to 4 inches of the moist newspaper. Continue to fluff it up so that it is nice and airy. If you have any old leaves or leaf litter, that can be added also. Throw in a handful of dirt for “grit” to help the worms digest their food.


5. Add your worms to the bedding.
6. Cut a piece of cardboard to fit over the bedding, and get it wet. Then cover the bedding with the cardboard. Worms love cardboard and it will break down within months.

7. Place your bin in a well-ventilated area such as a laundry room, garage, balcony, under the kitchen sink, or outside in the shade. Place the bin on top of blocks or bricks or upside down plastic containers to allow for drainage. You can use the lid of the second bin as a tray to catch any moisture that may drain from the bin. This “worm tea” is a great liquid fertilizer that can be used right away on your indoor or outdoor plants.
8. Feed your worms slowly at first. As the worms multiply, you can begin to add more food. Gently bury the food in a different section of the bin each week, under the cardboard. The worms will follow the food scraps around the bin. Burying the food scraps will help to keep fruit flies away.
THE SKINNY ON WORM FOOD
What do worms like to eat? Worms are vegetarians. They like green stuff mostly and absolutely no meat and no dairy. That means no bones, no grease and no anything with grease. On the other hand, almost anything else that would normally go down the garbage disposal can go into your worm bin. Just don’t be surprised if you notice that some foods will be eaten faster than others. Worms have their preferences just like we do.
Worms LOVE this stuff
Breads & Grains
Cereal
Coffee grounds & filters
Fruits
Tea bags
Vegetables
Fruit & veggie peels
Rice & Pasta
Worms HATE this stuff
Dairy Products
Fats
Meats
Oils
Worms LIKE brown stuff too!
Newspaper
Office paper
Leaves
Cardboard
Paper towels
TP rolls
WHEN THE WORM BIN IS FULL
When the first bin is full and there are no recognizable food scraps left, it is time to split the bin so you can begin the harvest.
Place new bedding material in the second bin and place the bin directly on the compost surface of the first bin. Bury your food scraps to the bedding of the second bin. In one to two months, most of the worms will have moved to the second bin in search of food. (Remember those little drill holes we made at the onset?)

Now the first bin will contain (almost) worm free vermicompost. There may be a few straggler worms left in the first bin. These can be gently lifted out of the bin and placed in the new bin or you can simply add them to your garden along with the new compost.
If you don’t care about creating a second harvest down the road, you can skip the step where you split the bin. The worm population will adapt to the amount of space and food available and things will remain stable until you decide to remove the compost and begin the process all over again.
TROUBLESHOOTING
| Problem | Probable Cause | Solution |
| Worms are dying or trying to escape | Too wet | Add more bedding |
| Too dry | Moisten bedding | |
| Bedding is used up | Harvest your bin | |
| Bin stinks! | Not enough air | Drill more ventilation holes |
| Too much food | Do not feed for 1-2 weeks | |
| Too wet | Add more bedding | |
| Fruit Flies | Exposed food | Bury food in bedding |
A NOTE ABOUT THE WORMS
Here in the Pacific Northwest, you can gather your own red worms. All you need to do is to put out a large piece of wet cardboard on your lawn or garden at night. The red worms live in the top 3 inches of organic material and like to come up and feast on the wet cardboard. In the morning, lift up cardboard to gather your red worms.
Elsewhere, or if you don’t have a lawn or suitable garden, you can purchase worms. Be sure to ask for “red wigglers”.
According to Chris Benedict, a Regional Extension Specialist at Washington State University, an earthworm can consume about 1/2 of its weight each day. He says, for example:
If your food waste averages 1/2 pound per day, you will need 1 pound of worms or a 2:1 ratio. There are roughly 500 worms in one pound. If you start out with less than one pound, don’t worry they multiply very quickly. Just adjust the amount that you feed them in accordance with the size of your worm population.
Check out Composting with Red Worms for lots more information about caring for your worms!
THE FINAL WORD
Imagine how easy it would be to create organic compost for your garden without having to trek to an obscure corner of your backyard in order to carry your food scraps to the compost bin. Instead, why not let red worms eat your food wastes? In a matter of months and not years, you will end up with one of the best soil amendments out there, namely worm castings.
My thanks to Chris Benedict who provided inspiration and gave me permission to use his ideas and his photos in this article. In addition, he has provided this link for building a more advanced, wooden worm bin: Build a Worm Compost Bin.
If your have not done so already, read Learn to Love Worms with Vermicomposting. And after that? My guess is that you will want to go out and get some materials so that you can build your own worm bin!
Enjoy your next adventure through common sense and thoughtful preparation!
Gaye
If you have not done so already, please be sure to like Backdoor Survival on Facebook to be updated every time there is an awesome new article, news byte, or free survival, prepping or homesteading book on Amazon. In addition, when you sign up to receive email updates you will receive a free, downloadable copy of my e-book The Emergency Food Buyer’s Guide
Bargain Bin: Today is all about worms and vermicomposting. I addition, there are some links to the products featured in the popular Backdoor Survival article, Prepper Checklist: DIY Cleaning Supplies.
Composting with Worms Step by Step: This 12 page eBook is 100% free for the taking. You don’t even need your e-mail address. It is a quick, interesting and fun read.
Uncle Jim’s Worm Farm 1,000 Count Red Wiggler Live Composting Worms: It may seem weird to purchase worms online, but if there are none available locally, you do what you have to do. My friends Eve and Randy are digging some up for me from yard. I am blessed!
The Worm Book For Beginners: This Kindle book is a simple and straight-forward introduction to vermicomposting. The author explains how to set up a simple starter bin, how and what to feed your worms (and what not to feed), the proper temperature, pH, and moisture levels needed and more.
Worm Factory 3-Tray Worm Composter: If you would rather purchase a worm bin, this highly rated worm bin has a compact square design that delivers a really small footprint making it the perfect composter for anyone with space limitations. When full, each tray weighs only 12.5 pounds making lifting and arranging trays effortless.
Dr. Bronner’s Sal Suds Liquid Cleanser: I know that Dr. Bronner’s Magic Castile soaps have a cult-like following but I prefer the Sal Suds. I call my DIY cleaner “Sudsy Sal”.
NOW Solutions Glycerin Vegetable, 16-Fluid Ounces: You will need this for your Dirt Cheap Soft Soap. I paid almost as much for only 4 ounces locally. This is a great price and 16 ounces will last forever.
NOW Foods Peppermint Oil: I favor peppermint essential oil (okay, I like lavender too) so this is what I get. But there are many types of essential oils to choose from. Take your pick. One thing you will find is that a little goes a long way.
Soft ‘N Style Clear Spray Bottles: These are the larger, 16 ounce size. You can also get these smaller bottles and some reasonably priced pump dispensers.
Microfiber “Magic” Rags: No list of cleaning supplies would be complete without these wonderful microfiber cloths. They will last you for years and will allow you to replace paper towels forever. Truly. I color code using green for glass and windows and the other colors for everything else. I love these.


10 Responses to “How To Build A Worm Bin the Cheap and Easy Way”
Hi, I’ve successfully set a worm bin by following your easy to follow instructions. It’s only been 2 weeks and the worms are busy at work. Can I go on vacation for 10 days without a “worm sitter” if the bin is kept indoors? Thanks!
Worms have lived outside in nature for millennia with out any help from humans. Worm composting is much easier outside because you don’t need to regulate everything–water, food, temperature. You don’t need any kind of bin or container. Just make a small pile. It must be on top of soil! Add bedding of shredded straw, torn up cardboard, shredded paper, or my favorite dry leaves. On top of that add the worms and food. Then add another layer of bedding. Worms will die if it is too dry or they are in sunlight for more than a few minutes. As long as you provide them with food, bedding, and consistent water the worms will never leave. Worms live in the top 12 inches of the pile so don’t make it tall like a regular compost pile. The pile should be evenly moist but not water logged. Build the pile behind some shrubs or flowers and no one will know it’s there. I feed the worms all my kitchen scraps and most of my yard waste. My pile is about 2′ wide by 18″ high and can be 4-10 feet long, depending when I last harvested the worm poo. I usually harvest the equivalent of 50 gallons a year. It’s enough to cover my whole veggie garden, and most of the flower beds too. Don’t over think it. It’s easy and natural. Amazing stuff!
Do you have a recommendation of about how many worms per gallon (tub)?
Do the worms not crawl out of the bottom of the bin where you drilled the holes?
I think bricks is also a good idea.
Red worms are not vegetarian (at least mine aren’t). I have put dead wood rats in my worm bins (outdoor) and there was nothing but a clean skeleton and some skin in about 2 weeks. I think the objection to meat and bones is for indoor worms where it might create an odor problem.
There is also the possibility that the microorganisms in the soil decomposed it.
You can also throw down an old carpet or throw rug, get it wet and gather them up the next morning. I’m not sure why they’re attracted to carpet but, they are. Then again, maybe it’s because of all the small specks of food a person or family drops on them.
Those cups are strong enough to hold the bins?
Mike – Those are plastic tubs and not paper, but even so, that is a good question because the bin full of word castings will be heavy. I have not gotten that far myself but using bricks would seem like a better idea.