

This site contains affiliate links. As an Amazon Associate, I earn a commission from qualifying purchases at no extra cost to you. Full Disclosure Here.
Editor’s Note: This is an updated and revised edition for 2018.
- It is not dehydrated, freeze-dried or cooked in any way.
- It will provide 182 generous servings.
- It is inexpensive and easy to store.
- It will all fit nicely into a quart canning jar.
- It is a power packed green food source.
- It will provide fresh greens daily for one person for six months.
- It is tasty, crisp and fresh, year round.
- Kids really enjoy growing these vegetables all by themselves.
By now, you may have guessed that we are talking about glorious sprouts.
These power pack little morsels are readily available in grocery markets and health food stores everywhere, ready to eat. You have most likely tried them already and formed an opinion about them. If that opinion is not favorable we may be able to change your mind after you read more about them.

Organic sprouting seeds may be purchased at most any health food store or seed outlet. Seeds can be stored for several years if in a cool, dry place away from light. Make sure the sprouting seeds you choose are not chemically treated or genetically modified.
If you are in doubt, ask the store manager. Make sure they know you plan to sprout them. Most sprouting seeds are labeled as such so there should not be a problem.
Sprouts are very versatile in flavor, texture and size. The vitamins and minerals they provide also vary by seed type. (We will discuss the variety of seeds later.) All are packed with vitality and life. You’ve probably tasted them in an oriental restaurant or had them in a sandwich or taco.
By the end of this article, I hope you will appreciate how important sprouts can be to your healthy food self-reliance program and how to use them to add a natural, whole, live food to your family’s diet, especially in times of stress, when good nutrition is absolutely needed for clear, calm thinking and sustained health.

Most of our food storage is canned, pickled, bottled, dehydrated, freeze-dried, fermented, powdered, smoked or frozen. Fresh greens or vegetables are just not part of most extended food storage preps unless you are fortunate enough to have a root cellar, greenhouse or year-round garden.
Fresh foods rot fairly quickly therefore many storage plans leave them out of their plans altogether or rely on summer gardens and a few cool weather crops. Some people have no place to grow fresh produce in significant amounts. But with sprouts added to our preps, we have year round access to wonderful, versatile, healthy green vegetables.
How great is that!
A great deal of our food is mass produced, sprayed with a mountain of chemicals, picked before it ripens, grown far away and shipped thousands of miles in boxes on ships and in trucks then sprayed again to “look fresh” when they are put on our grocery shelves.
Learning how to grow your own nutrient dense sprouted vegetables, can give you access to a food that can be “harvested” at the exact peak of freshness and consumed immediately or within a few days. It is satisfying to eat food you have grown yourself and that you know is beneficial to creating a healthier body.
The time is now to creatively introduce sprouts to your family. When our eldest daughter was about 4 years old we grew some sprouts together, watching and anticipating their fast growth and yummy taste. Five days seemed like an eternity to her.

I was concerned that she might not enjoy the taste, so for lunch on the fifth day of sprouting I surprised her with a snowman sandwich by taking 2 slices of bread, cutting out 3 circles with biscuit cutters. These became his body. I gave him a peanut butter vest and pants and banana boots and mittens…you can “dress” him in a jelly shirt… sounds time consuming but really, it was quick and easy.
Then he “sprouted” lots of curly green “hair.” He looked a little wonky but she was delighted and ate every bite. She put the hair between the bread circles and laughed the whole time. Of course I didn’t do this every time she ate sprouts but I wanted to make sure, if possible, that she got a happy start to that initial sprout tasting experience.
Note: Many years later I tried this with her son and he would have none of it! So, no guarantees!
Nutrient Dense
Any seed that can be grown in soil can be sprouted without soil under the right conditions. But you might say, “From where do they draw their nutrients if they are not planted in rich soil? Don’t plants get their goodness from the soil?”
That is the beauty of sprouting!
They are such a living powerhouse of goodness and contain so many vitamins and minerals that they can sprout without needing to draw other nutrients from the soil! These seeds are alive and generate their own growth from within the seed or bean. By sprouting, we release those nutrients that then can be eaten and absorbed into our own bodies!
Sprouts contain protein and if their leaves are allowed to turn green they also contain chlorophyll. Sprouts are rich in vitamins A, B, C, D, E and K, all of which are immune building, detoxifying, cardiac protective, and fight degenerative diseases. All that goodness packed into one tiny seed!

Sprouts also contain trace minerals like calcium, copper, potassium, iron, magnesium, zinc, selenium and others depending on which type of seed you sprout. Our bodies need these trace mineral to cause essential chemical and electrical reactions within our bodies.
Sprouts can absorb trace minerals from the soaking water we use to jumpstart their growth so be sure to use good mineral rich water and not distilled water. As an aside, if you are in the habit of drinking distilled water or reverse osmosis water, make sure to add trace minerals to it.
The one our family uses is from, Trace Minerals Research. They are sold in a liquid form in most health food stores in cobalt blue squeeze bottles.

Caution: Here let me make a small caveat: All the sprouts of the solanaceae family: tomato, potato, paprika, eggplant and rhubarb cannot be eaten as sprouts, either cooked or raw, as they can be poisonous.
Seeds intended for sowing may be treated with chemical dressings. Several countries, such as New Zealand, also require that some varieties of imported edible seed be heat-treated, thus making them impossible to sprout.
Quinoa, one of my favorite grains, in its natural state, is very easy to sprout but when polished, or pre-cleaned of its saponin outer coating , loses its power to germinate. So when purchasing sprouting seeds make very sure they have not been through these processes of chemical dressing or heat treating or they will not sprout.
Sprouting seeds can also be purchased online and are labeled as such. Don’t worry, it isn’t as complicated as it may seem. Even our rural health food store carries them in their cold bulk room and they are well labeled as sprouting seeds. An east alternative is to order online.
Enzyme Enhancers
Dr. Anthony Cichoke, who has written several books on enzymes, calls easily digested sprouts “Enzyme-Enhancers” because they provide the richest source of plant enzymes to aid in the digestive process. So if you have digestive challenges, adding sprouts to your diet, and chewing them well, should bring natural relief.

But make sure the sprouts are raw since any food heated to over 140° loses enzymes and potency. Enzymes are only present in raw, live foods and sprouts have a surprising amount of them. They give our bodies the boost of energy and vitality we all need. In order to release more of those enzymes from our food we should become mindful of the speed of our eating.
As we take time to chew well, more surface of the food is exposed to our saliva. Our saliva contains enzymes that help breakdown our food. Digestion actually begins in the mouth. If we chew briefly and swallow quickly the chance of having poor digestion and gas increases.
Remember when your mother told you to chew your food well? She was right!
So having healthy enzymes available is another excellent reason to add sprouting seeds to your food storage plan.
Versatility
There is almost no limit on the variety of seeds or legumes that can be sprouted. The more common seeds are alfalfa, mungs bean, radish, red clover, lentils, broccoli and wheat. These are usually easily available.
Sprouting wheatgrass is a topic for another time because it takes place differently than other sprouts. I’ll briefly go over some of the more popular seeds.
1. Alfalfa
These sprouts are probably the most commonly recognized sprouted seed and are mostly used in sandwiches and on top of green salads. They are easy and quick to grow and have a mild flavor and crunch. They are vitamin rich, readily available either fully sprouted or as seeds.

They grow rapidly over 3-5 days to maturity. If folks try sprouts, usually it’s alfalfa. Some people do not appreciate the taste, and then refuse to experiment with other varieties of seeds and miss out on some of the healthiest, tasty morsels around. We’ll cover the general how-to’s of growing later.
2. Radish Seeds
These are one of my favorite sprouts because of their “pop of hot”. They are a bit spicy and not at all bland. Don’t worry that they will be ‘too hot’ though. The taste is distinctive and pleasant.
I guess a bit like a radish, right? So if you don’t like radishes just move along to another seed type or blend them with other foods.
Consider these health benefits: high in vitamin C and research shows that they rival broccoli sprouts in having anti-cancer properties. They provide a sense of fullness after eating, helping you eat less without compromising on nutrition.

In a food shortage situation being full while eating less could bring untold advantages. If you are dieting to lose weight think how adding radish sprouts would make it easier to stay on that diet plan.
Radish sprout enzymes break down the starch in foods, which increases the absorption of nutrients, another great reason to have a little each day. If you are gut compromised, as many folks are these days, then increasing nutrient absorption is huge.
Radish sprouts mature in 4-5 days and are harvested when about 1-1 ½” long. Below you will see time lapse type photos of radish sprouts as they mature.
3. Mung Beans and Lentils
These are thicker than either radish or alfalfa sprouts and can be used in stir fries. Be careful to add them at the very end of the stir fry process so they do not heat to over 140° when they would lose the potency of their enzymes.
They’re legumes and are high in fiber, so a thick mung bean soup is not high calorie or high carb and will keep you full. This is something to consider when and if food every gets in short supply. Mung beans are a high in manganese, potassium, magnesium, folate, copper, zinc and various B vitamins. They fill you up, and are high in protein and dietary fiber.
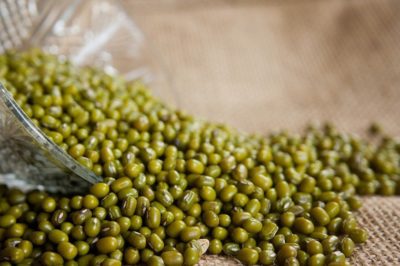
They take about 3 to 4 days to sprout but the sprouted tail is shorter than most seeds and can be harvested at about ¼” in length or a bit longer if you prefer. You might want to rinse off the outer brownish green skins before eating the sprout.
This holds true for any sprouted seed. They won’t harm you but they sure don’t make a good impression when you give a big smile and they are lurking between your teeth! Hmmm, of course this has never happened to me.
4. Broccoli
Another of my favs! One tablespoon yields two cups of sprouts.
It takes about 4-5 days to reach the optimal tail length of one inch. Broccoli seeds only need to be rinsed twice a day. Researchers are finding remarkable evidence that broccoli sprouts have a heap of benefits in treating and preventing diseases.
Anti-Cancer: A recent study at Johns Hopkins (and other universities as well) have found that broccoli sprouts contain a compound called sulforaphane that may treat or prevent cancers like breast and prostate cancers.
This is a compound that may stop the growth of malignant tumors. Being a nurse and having worked at a large hospital in Baltimore in an oncology unit, this excites me. Just adding it to a cancer patient’s diet is another tool in the battle.
Whole broccoli has suforaphane, too, but not in as large an amount as the sprouts. One university study found that the sprouts have 10 to 20 times more sulforaphane than whole broccoli! Cancer prevention is yet another great reason to add this tasty sprout to your food storage plan.
There are many other medical benefits to broccoli sprouts and in fact all sprouts. Having a nutritious green, living, power-packed food available during any short or long-term crisis is worth its weight in gold!

For my money, this Now Real Food Sprouting Jar is the easiest, cleanest jar to use and at the price for this half gallon size it’s very reasonable. I like that it is made of glass. My first sprouting jar was translucent plastic.
I could see the growing sprouts dimly but not enough to easily see if their development. Then I began using quart mason jars. I had plenty of those and didn’t have to spend more money. They worked well but they weren’t large enough and the plastic lids I bought to use on their tops, pictured below, all had holes that were too large for the smaller red clover seeds.
Putting cheesecloth over the jar opening was okay but could be a little tricky because they sometimes popped off when I was shaking the excess water from the jars even if I was trying to hold them in place.
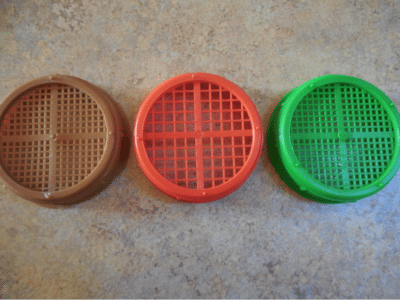
The plastic screening in these drainage lids were too large for the alfalfa, clover, amaranth and even wheat seeds would occasionally slip through these openings. There are sturdier plastic ones on the market now with smaller holes. Of course cheesecloth and a rubber band is an option. But stainless mesh can’t be beat in my book.
Layered Sprouting Container
Next I tried a layered sprouting container.
That was the method I used for years and I liked the versatility of being able to sprout multiple varieties of seeds in different layers in the same container. Mine was compact and easy to use. It is a good choice if you are interested in experimenting with various seeds or beans.
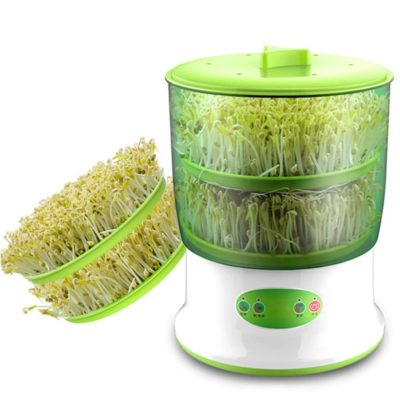
I still have that layered set up but since finding the half gallon Now Sprouting Jar a couple of years ago it has become my new favorite. It’s larger, it is glass and it has that great stainless steel finely screened screw on lid. Keeping these two going at different phases of growth works for us. Like Mary Poppins, practically perfect in every way!
Just love them. And no, I am not being paid to say that!
It also stores the finished sprouts in the refrigerator very nicely. Or you can transfer the sprouts into another glass covered container and then begin the next sprouting process. At our house within 4-5 days that first batch will be eaten and the new one ready.
Once your sprouts have reached the length you desire, they will remain fresh and crispy for up to two weeks if kept covered in the fridge. I find that putting a moist paper towel over the sprouts before clamping the lid helps them to stay crisp and last longer.
Step-by-Step Sprouting
I have chosen radish seeds to demonstrate this process.

Raw nuts and seeds have a high level of phytic acid. While this substance is a protection and antioxidant for the seeds and nuts, when eaten by humans it binds to minerals in the gastrointestinal tract, causing irritation and contributing to the potential for nutrient deficiencies.
The enzyme inhibitors found in seeds and nuts also serve to protect them from sprouting and growing prematurely. So we soak the seeds to remove the phytic acid that can cause intestinal distress and to remove the anti-germination enzyme inhibitors, after all, we want these tiny seeds to sprout and grow so our bodies can then soak up all of those healing, life giving substances.
In a nutshell the phytates and enzyme inhibitors that make nuts and seeds so tricky to digest can be easily neutralized by soaking them in water.
The Process:
There are a few things to remember when sprouting seeds.
- Choose high quality, untreated, GMO seeds, legumes or grains (henceforth called seeds)
- Soak the seeds in sprouting container in lukewarm ( 60-70 degree) water overnight. Smaller seeds are sometimes soaked for only 5-6 hours. Check sprouting timetables for specific soak and sprouting times for the particular seed you’ve chosen. Use about three times as much water as seeds. Some people add about a teaspoon of citric acid to the soaking water. I have not used the citric acid but when we first started sprouting seeds years ago I lost a couple of batches to mold and one batch probably to city fluorinated, chlorinated water.
- Make sure there is no standing water inside your sprouting container! It will rot your seeds. Pour the soaking water out and rinse seeds with a few cups of lukewarm water. Rinse well and shake out the excess water. You don’t have to be delicate. Shake that jar 18-20 times to make sure there is no extra water in the jar. After this some people put the jar in a bowl, screen side down at a 45°, to drain well. You can do this if you wish. Set the jar out of direct sunlight. It doesn’t have to be in a completely dark place though, as some sources say. At this point the sun can dry them out quickly.
- Rinse seeds 2-4 times a day, depending on the kind of seed, following the same process as above.
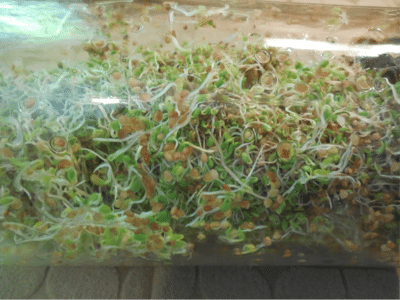
- Do this until sprouts have reached the desired length. To increase chlorophyll content put the sprouts in a sunny place for a few hours, up to a full day, making sure they don’t dry out. The leaves will turn a beautiful darker green.
- Some people like to remove the seed hulls. Demonstration photos near the end of this article.
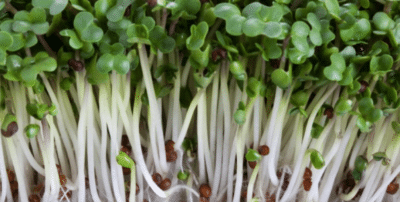
DAY ONE: Already you can see the tiny sprouting tails.
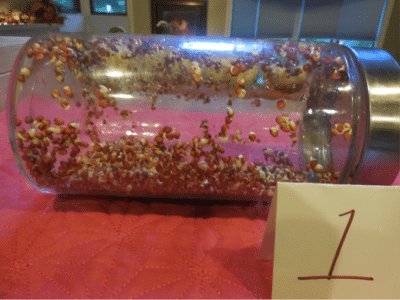
DAY TWO: Isn’t it exciting to watch how quickly sprouts begin to, well, sprout? Little children get very excited about this process! I still enjoy watching the process myself.

DAY THREE: The excitement is growing as your children continue to see the miraculous growth. This might be a good time to talk about how seeds grow in different ways. Some in soil and some like these tiny sprouts that don’t need soil and have all the power and food they need right in the seed to grow and become food we can eat so our bodies can grow.
They will probably have many questions of their own as they watch the develop over several days. Even talking to them before you start the process and getting their ideas of what they think might happen, would be fun.
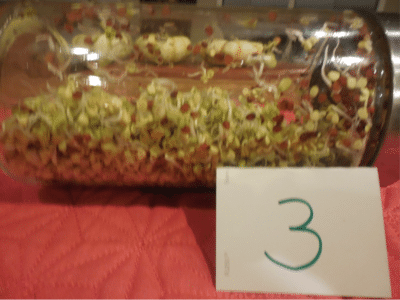
DAY FOUR: Almost there. Seeds yield approximately 7:1, which means the sprouts will weigh 7 times as much as the seeds you started with, but they will increase even more in volume—so don’t start with more than 2 Tablespoons per quart jar. My jar below is half-gallon size.

DAY FIVE: These little radish sprouts have grown to taste like a fully developed radish. Hot and spicy. It would be fun to have a bright red radish to show to and taste with your children or grandchildren who have been following this process for five fun days. This is like a tasty science experiment for four to eight year olds!

In a grid down situation, this would be an exciting project to keep them occupied and happy. In saying this I am by no mean minimizing a hard circumstance, merely pointing out that the stresses on children and adults can be handled in productive, stress reducing ways while working and playing together.

To remove the sprout hulls, fill the jar or a bowl with water till the hulls and sprouts rise to the top. Skim off the hulls. Some may remain at the bottom of the jar so just close the lid and shake a little till they rise. Skim again if you’d like.
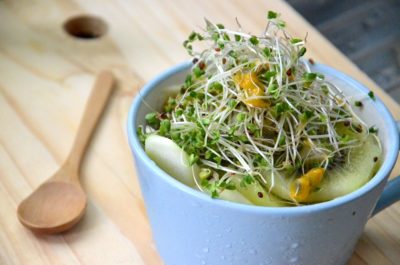
Alfalfa Sprouts. Note they have a thinner tail than radish sprouts. Each type of sprout has its own unique flavor. Sprout a variety until you find your favorites.

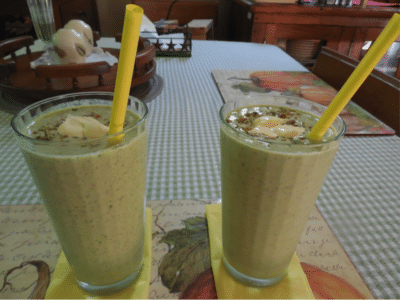
I don’t measure ingredients but there is what is in these smoothies. Change it up as desired.
- Plain organic yogurt (Aldi’s is good and less expensive) about 2 heaping cups
- frozen cut up banana, mix of frozen fruits of your choice but this has strawberry, peach and mango pieces that I bought for $2.00 at Aldi’s (used ½ a bag)
- 1 ½ cups of alfalfa sprouts
- 1 packed cup of organic mixed greens from Aldi’s
- 3 drops of wild orange essential oil
- a few leaves off of my stevia plant but if you don’t have a plant then just a tad of powdered stevia to taste will do perfectly
- 2 teaspoon pure vanilla extract
On top is an optional mix that I whirred in the blender of seeds and nuts and then a dollop of rich cream, also optional. Play with the recipe, leave something out or add something you love.
Oh, I did put in one small pawpaw since this is the season and they are so smooth, sweet and nutritious. The glasses are 14 oz. This makes a full lunch!
Ways to Use Sprouts
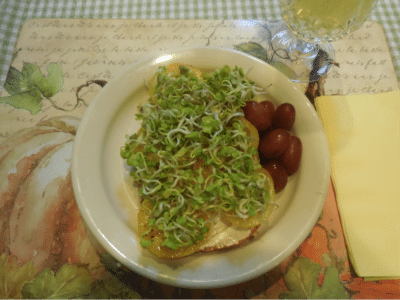
Broccoli sprouts can be eaten raw, stir-fried or steamed. They look decorative in salads or piled on top of sandwich fillings like chicken or egg salad. A bit of mayo or a light dressing of your choice makes them truly delicious.
You will not lose the nutrient content by steaming your sprouts. You will best preserve the nutrients, though, if you do not cook the sprouts for long. If using the sprouts in a stir-fry, cook the sprouts over a very low heat and don’t let them cook for more than a few minutes or throw them raw on top.
They are delish in wraps or in smoothies as we talked about earlier. Discover your own favorite way to use your sprouted bounty. Get your family used to eating them.

Make sure to rotate your storage of sprout seeds about every year to make sure they are viable when you need them the most. Store them in a glass jar or in sealed Mylar in a cool place away from direct sunlight.
Remember that seeds that germinate have a shelf-life. Each additional year that you store them less of the seeds will sprout. Don’t just store and forget. Learn to sprout them, eat them, find your favorites, experiment with ways to enjoy them, teach your children how to sprout them.
And most of all have a good time while learning to be better prepared for an emergency.
Happy Sprouting!
If you enjoyed this article, consider following our Facebook page.


9 Responses to “How to Grow Sprouts: How To Store 182 Servings of Raw Green Vegetables in a Quart Canning Jar”
Dear JoEllen and Gat,
Such good questions. I was remiss in not including that information in the original sprouting article. So since the questions deserve complete answers I will write a full article about seed storage. I can’t say when the publish date will be but I’d imaging within 4-6 weeks…….so keep an eye out. Thanks to you both for the thoughtful questions. Perhaps other readers were wondering about long term seed storage so I’ll get on that right away. But the answer in one word is Yes they can. Stay tuned!
Gat and JoEllen,
If you search back in the BDS files you will find an excellent article “8 Tips for Storing Seeds for the Long Term” by Gaye Levy. I would recommend that to you.
What is the best way to store sprout seeds in bulk, and how long will they keep? I would like to make these an addition to my long term food storage.
Thanks for a great article.
How much seeds for sprouting do you suggest putting in your food storage (long term) and what is the best way to store the seeds for maximum sprouting? Is freezing ok?
I do some sprouting and usually by my seeds from Mumm’s (sprouting.com). They are excellent quality and they carry a huge variety of high quality seeds. Thanks for the article!
I just sprouted my first radish seeds. It is 6 days taking them out they smell a little funky. Is that right
Of by “funky”, you mean moldy then No! don’t eat them. If you see mold give the sprouts to the birds. To troubleshoot it is likely that the sprouts were not rinsed them drained well enough. I hope you will try again because sprouting seeds are so nutritious and add so much to a healthy food storage plan! Thanks for your comment Bill.
Interesting, thorough article! Loved seeing the photos showing the stages of the sprouts’ growth.
Thank you saying so Virginia! I hope people who have never tried them will give a go too. The nutritive value of sprouts is off the charts.
It has been years since I sprouted seeds. After reading your article, I plan on getting back to it.