
This site contains affiliate links. As an Amazon Associate, I earn a commission from qualifying purchases at no extra cost to you. Full Disclosure Here.
Rocket Stoves are pretty neat. Common among campers and backpacking enthusiasts, rocket stoves are relatively new to urban dwellers or those that do not spend a lot of time outdoors. But wait – here come the preppers who seek fuel efficient ways to cook outdoors when the grid goes down. Not to make light of the situation, five years ago I had no idea what a rocket stove was nor did I know how they worked.
How times have changed.
While there are many commercial rocket stoves (and I own two including the Solo Stove and the EcoZoom Versa) an efficient rocket stove can be had for as little as a couple of bucks as you are willing to do a bit of work.
 But first, just what exactly is a rocket stove?
According to Wikipedia, a rocket stove is an efficient cooking stove using small diameter wood fuel which is burned in a simple high-temperature combustion chamber containing an insulated vertical chimney that ensures complete combustion prior to the flames reaching the cooking surface.
Seems simple enough, especially when you consider that rocket stoves are found more commonly in third world countries where wood fuel sources are scarce so an efficient system for converting twigs, branches, pinecones, leaves and other bits of biomass to fuel is essential to cooking.
Now as good as I am around the kitchen, in the garden and with the home and domestic arts, building stuff comes not so easy. So I asked Backdoor Survival sponsor Ron Brown who is a retired engineer and really good at this stuff to help me out with some detailed instructions for building a DIY Rocket Stove. He has convinced me that the process is easy and cheap, even for someone like me!
A Bit of Background
Ron told me that many years ago he made some maple syrup. Lacking any guidance, he constructed a boiling-down arrangement consisting of a simple campfire under a kettle. It takes 13 gallons of tree sap to make one gallon of syrup and he made several gallons. It was delicious but he burned a mind-boggling amount of firewood in the process. Not at all efficient and not something you would want to do in a survival situation.
Improvised rocket stoves that are common around the world come in lots of designs and various configurations. Their common advantage stems from a principle whereby three sides surround the fire while one side remains open. This facilitates combustion of the fuel and the ultimate creation of heat. Of course, “real” rocket stoves are double-walled and have insulation between the walls.
What we will be describing here uses just a big, institutional-sized tin can with one wall. Buy hey, it works. And besides, 80% of the efficiency improvement over an open campfire (Ron’s estimate) comes from the basic three-sided feature while only 20% comes from the insulation.
The Almost Free DIY Rocket Stove
To get started, you are going to need the following:
Materials:
1 No. 10 size steel can (institutional size) You can also use a 3-lb. coffee cans or a one-gallon paint can
1 cast iron trivet (check the Dollar Store for this)
1½ cups marbles, small rocks, or gravel
1 hinge
1 “turn button door catch”
2 bolts for door-legs (size 8/32 x 3) with 4 nuts
5 sheet metal screws for door hinge & door catchTools:
Utility knife
Hammer
Can opener
16-penny nail (sharpened) to serve as a punch
Screwdriver
Pliers
Vise
Short length of 2 x 4 (to clamp in vise and use as support when cutting/punching can)
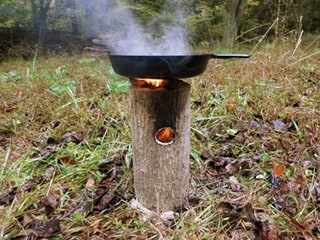
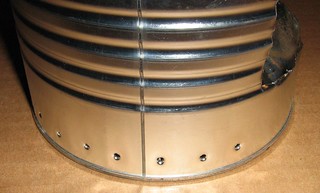
1. Cut off the can’s top and save it. Empty the contents, rinse out the can, then cut a rectangular hole to make a door in the side of the can. The can shown here is 6″ in diameter and 7½” tall. The door is 5″ wide and 4½” high. The bottom edge of the door is 1½” above the bottom lip of the can.
To cut out the door, I support the underside of the metal with a stick of wood clamped in a vise and simply cut the sheet metal with a utility knife (the kind with the replaceable blade). Admittedly, this method takes a fair amount of strength and not everybody will be able to do it this way.

An alternate method is to use a sharpened nail and punch a row of small holes along the perimeter of where you want the door to be. Punch the holes as closely together as possible. Then use a knife or a hacksaw blade to cut just the webbing between the holes. It’s a bit slow and tedious, but it works.
Tin snips are not practical for this job. Tin snips have jaws the width of your finger. We want a narrow slit plus four square corners.
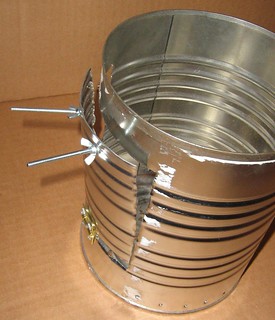
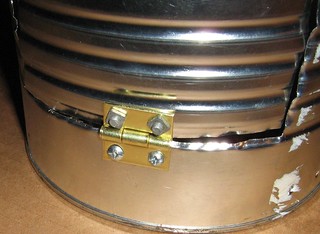
2. Put one small hinge in the bottom-center of the door. Fasten it to the can with either small nuts-and-bolts or sheet metal screws.

3. Install 2 bolts near the top of the door to serve as legs when the door is open. In use, the door stays open most of the time and serves as a mini-table to support the fuel-wood that we feed into the flame.
4. Install a small metal “turn button door catch” to hold the door closed when it’s not needed. As shown in the pictures, I fashioned a catch from “plumber’s strap.”
5. Punch a row of holes around the bottom of the can to let in air. Or, cut triangular holes using a church-key style can opener. These holes are down near the bottom lip of the can but are in its sidewalls, not in the can’s bottom.
6. Put gravel or small stones or glass marbles in the bottom of the can. You’ll need about a cup and a half. (Marbles are best because natural stone contains moisture which can turn to steam and split a stone in half when it expands. POW! It doesn’t always happen but, if it does, it will get your attention, guaranteed.)
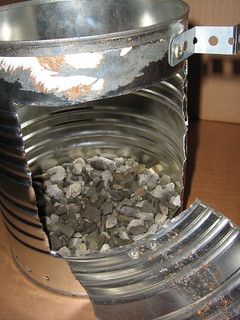

7. Punch lots of holes in the upper can lid that we removed in step #1. Place it inside the can, on top of the marbles or gravel. The lid-punched-with-holes is then the floor upon which we build our fire.
Combustion air enters through the holes we punched in step #5, circulates between the marbles, comes up through the holes in the floor, and feeds the fire with oxygen.
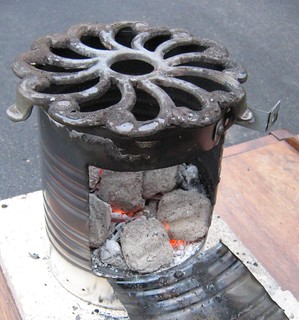
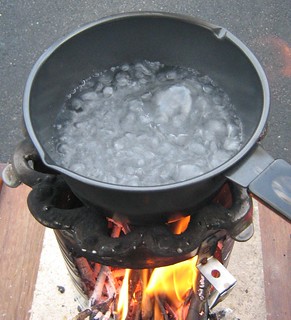
8. Oh! Lest I forget. The Dollar Store trivet will come to you painted. That paint will bubble and scorch off in its first use. Scrape away whatever remains.
9. In use, put a flat stone or a layer of firebrick under this stove. Glowing bits of wood will leak out from time to time.
10. Think safety! This is a live, burning fire, nothing to joke around with. Leather gloves, pliers to use as tongs, a fire extinguisher or bucket of water . . . all excellent ideas.
Some Extra Credit Hints

When used as a rocket-stove top, turn the trivet upside down if you’re cooking with a large pot or griddle. The legs on the trivet, pointing skywards, support the griddle. You can’t block off the top of the can (what amounts to a chimney) completely. There must be some space around the bottom of the pot or griddle for smoke to escape.
This stove can be used as a small charcoal grill. Despite its crude appearance and obvious limitations, it works well. Once started, it boils water faster than the gas range in the kitchen.
By the way, neither Ron nor I have discovered where the “rocket” part of the name comes from. Maybe it just sounds sexy. Perhaps far more relevant is the question, “What’s for dinner?”.

The Final Word
Factory made rocket stoves are great but they will set you back about a hundred dollars on Amazon and elsewhere. These are highly efficient and look “pretty”. But as Ron says:
For my money, seeing as how we’re burning pine cones, twigs, and scrap lumber . . . and seeing as how this is for emergency use, not day-to-day cooking for life . . . and seeing as how the factory-made model is just as dirty to clean out as this one . . . and will carbon up the bottom of your pots and pans just as quickly . . . I’m gonna opt for the improvised/free version. Free is good.
Just keep in mind the following disclaimer: Use this rocket stove outside. If you would not start a campfire in the middle of your kitchen countertop then don’t use this stove in the middle of your kitchen countertop. Don’t lay your bare hand on the trivet-top to see if it’s hot and ready to cook. Don’t pour gasoline on the flames to see what happens. Don’t toast firecrackers on the griddle. And do be careful of the raw edges on the sheet-metal door; they’ll cut you. This last bit is for real.
Enjoy your next adventure through common sense and thoughtful preparation!
Gaye
If you have not done so already, please be sure to like Backdoor Survival on Facebook to be updated every time there is an awesome new article, news byte, or free survival, prepping or homesteading book on Amazon. In addition, when you sign up to receive email updates you will receive a free, downloadable copy of my e-book The Emergency Food Buyer’s Guide.
PS – My sincere gratitude goes out to Ron for his help with this article and especially for the photos. His wit and sense of humor continually amaze me. Be sure to visit Ron’s website at Lanterns, Lamps & Candles. His e-book on CD is also amazing!
Bargain Bin: Cooking outdoors? Then for sure you need some cast iron goodies. Try these – I own all of them
Lodge Logic 12-Inch Pre-Seasoned Skillet: This purchase changed the way I cook. I use my cast iron cookware for everything from salmon, to bacon and eggs, to biscuits. Don’t forget the Lodge Set of 2 Pan Scrapers, a must have for cleaning those food bits from your cast iron cookware.
Lodge Dutch Oven/Camp Stove: I originally purchased this Dutch oven because it was so darn cute. But over time, I have learned to love it for its versatility. Remember, a camp stove is designed so that you can bake with it by arranging charcoal on top of the lid as well as underneath the Dutch Oven itself.
Ove’ Gloves Hot Surface Handler: I cannot say enough about these hand and arm protectors. I have permanent scars from hitting my arm on the rack of my oven. I can only imagine what I would look like if I did not use these with my cast iron cookware. Forget the colorful silicon hot pads. These are 1000 times better!
Four Silicone Brushes: I call these”mop thingies”. Great for layering a nice thin coat of oil on your cast iron pans.
Lodge 5-Quart Double Dutch Oven and Casserole with Skillet Cover: This is another cool piece. This Dutch Oven does not have legs and is designed for indoor use – but it can be used outdoors too. Just don’t forget the Ove Gloves.
Lodge Logic Pre-Seasoned 15 Inch Cast-Iron Skillet: Similar to the 12” skillet only bigger. Actually, quite huge (and yes, I finally have one!).
CLICK HERE to visit Backdoor Survival on Facebook. And CLICK HERE to follow Survival Woman on Twitter.
Spread the Word – Tell your friends: Share Backdoor Survival with your friends. All you need to do to send them a short email. Now that was easy!
I earn a small commission from purchases made when you begin your Amazon shopping experience here.
Shop Amazon Tactical – Great Selection of Optics, Knives, Cases, Equipment
Amazon’s Most Wished For Items in Sports and Outdoors
Help support Backdoor Survival. Purchases earn a small commission and for that I thank you!


20 Responses to “Building a DIY Rocket Stove”
This is NOT a Rocket Stove. I’ve built 2 of them, one for me and one for my son and his family.
Should have a center chimney (I used stacked 3″ dia cans surrounded by insulation like sand or vermiculite or perlite (I used a 50/50 mix of both) the chimney has a 90º bend to the outside of the main can used for fuel loading and air.
See one here: //www.youtube.com/watch?v=gQyU4lokVe4
Nice DIY. You are reffering to some pics which I cannot find them inside your post… are they already deleted? Pics will really help… Thx.
Ciprian – All of the pictures are showing up fine from my location. Perhaps there is a problem at your end? I know that sometimes browsers require you to “show pictures”.
Hope that helps.
— Gaye
Thanks for your reply. Now I noticed that your photos are posted on Flicker and my PC access is blocked to Flicker by network administrator. I will wait until I arrive home to download the pictures. Have a great day.
First your query about why it is called. Sixty years ago when I built my first stove I didn’t know it was called a rocket stove but I know the sound a rocket is supposed to make and guess what, that’s the sound it makes when you fire it up.
Our stoves have always been made large juice cans minimum 3 sometimes 4 they where like yours not to portable but very efficient. can1 is the stove door about 3×3 (we are not burning railway ties here) can2 spare parts, a door 4×4 and 2 strips 3 inches wide cans 3&4 are the chimney a strip of tin and a few screws hold them together.we had a few stability problems but bolting a 5gal paint can lid to the bottom solved these. I have looked at many many of these sites and just reached the point where typing 8 words a minute seamed worth wile, nothing about your attempt. p.s. I hope your engineering friend didn’t work on anything that flies.
Thank you all so much for this info; presented with such humility and wisdom and kindness.
I am definitely going to have a go on this one.
And thank you so much for the kind words, Tim!
For those who wish to keep using your electrical appliances… build a double barrel wood stove. Wrap the bottom barrel with soft copper 3/8ths tubing to create steam. Use the stem to drive a moified Tesla Turbine to run a large generator with a 50 kW output or higher.
Gary – Do you happen to have a link to an Instructable or DIY guide for this?
Coating the bottom and sides of your pots with liquid dish soap will decrease the clean-up. The soot will come off easier.
What you have described is an interesting variation on a hobo stove, but it is NOT a rocket stove.
The “rocket” in rocket stove comes from the preheated air entering an insulated combustion chamber and chimney that allows for almost complete (very efficient) burning of the fuel and associated gasses which results in little to no soot on your cookware. Generally the combustion chamber and chimney are relatively narrow in comparison to the outer can – if your large can is a #10 can, you would use regular soup/vegetable cans to build the feed port and chimney.
Here’s a bit of theory. As wood burns, it gives off gases. There is more potential heat in those gases than in the solid portion of the wood. But if the stove designer introduces enough oxygen to burn those gases, he inadvertently chills the fire to below the ignition point of the gases. A partial solution is to preheat the incoming combustion air. That’s done by bringing the incoming air up through the coals. And that’s what my design does. Admittedly, the sidewalls of my stove are not insulated.
Dr. Larry Winiarski invented rocket stoves. There’s a 3-minute YouTube video from 2008 (//www.youtube.com/watch?v=XSMR2ANIZ7E) showing him with a stove made from adobe brick. His sidewalls are insulated but the incoming combustion air is not preheated. Nonetheless, it’s billed as a smokeless, high-efficiency rocket stove.
Wood stoves (for home heating) have an efficiency rating. A grandpa-era wood stove was 40% efficient. There are brands today approaching 90%. But rocket-stove makers don’t provide numeric efficiency ratings. Why? I suspect that descriptive words (like “high efficiency”) are easy whereas numbers, after all the hoopla, might be a tad embarrassing.
Any wood fire, if you can see the flame, will carbon up the bottom of your pot. If you wait until the fire burns down to coals (marshmallow-roasting time), the carbon will be minimal. But in third-world countries, that’s not how these things are used. As soon as there’s a wisp of flame the kettle goes on. Every last calorie of heat is salvaged. A dirty pot is just the price you pay.
To be useful, a rocket stove must be more than just “efficient.” A flame the size of a birthday candle, no matter how efficient, is not much good for cooking supper. How long does it take to boil water on your rocket stove? How long on mine? There’s more than one way to rate these things.
Rate them any way you want. While it may be useful in certain situations, it is still not a rocket stove.
Thank you for the great instructions on making a Rocket stove. They are pretty expensive on Amazon, and anyway, my husband needs a project.
Thanks Gaye for a new way to use those large cans. I want to add a note though…as a past and I mean many years past Girl Scout we used to make something similar called a Buddy Burner and it was a fun way for Girl Scouts to cook. We used the same large cans, but left the top of the can for a cooking surface. The bottom side opening cut was large enough to slip a tuna can into for the heat and bottle opener punches on the side at the top as a vent. The tuna can was filled with wax/paraffin and cardboard strips rolled into a spiral and placed into the tuna can with the melted wax. After the wax cools you have a source of heat. Not as durable as your stove, but it would work in a pinch or if the worst happens….. We cooked many an egg breakfast, hamburgers, etc. on those little stoves. Brings back so many fun memories and funny stories….. Just a tidbit from the past…
I was never a Girl Scout in my youth but I like to think of myself now as a grown-up Girl Scout 🙂
Easy enough to try. Mine had a handle that does not get hot which would be an added bonus. Intereting thought.
This sound a lot like the charcoal starters which take briquettes on top and a little paper on the bottom. I wonder if you could fashion a rocket stove from one of those…