

This site contains affiliate links. As an Amazon Associate, I earn a commission from qualifying purchases at no extra cost to you. Full Disclosure Here.
Getting prepared, and becoming a Prepper, has got to be one of the more important challenges for families living in the 21st century. The reasons are clear.
We live in an uncertain world with a shaky global economy, extremes in weather, nasty superbugs, risk of an EMP, and threats of cyber-attacks as well as terrorist attacks by militant political regimes. Add to that disappearance of the middle class, Wall Street corruption, and an ever increasing dependence on petroleum products, and indeed, there is cause for worry.
For these reasons, a sizable segment of the population has turned to prepping and family preparedness as a solution to the inherent dependence we have on supermarkets, shopping malls, organized medicine, and government. It is not that these entities are going away, not at all or at least not right now. It is simply that we prefer to be self-reliant and independent of third party interference with our lives.
Preppers, and those that embrace the prepper lifestyle, embrace what is commonly called the “Survival Mindset”.

What is the Survival Mindset?
The survival mindset is a frame of mind whereby daily life is focused on the pursuit of independence and self-reliance. This focus is done in a non-obtrusive way to the detriment of no one and the betterment of everyone. It is a lifestyle and a commitment to preparedness and to courage, to optimism and to family values.
Ultimately, it is the will to live and to survive with the knowledge that you have done the very best you can to protect yourself and your family from danger and the woes that come from living in complicated and uncertain times.
What I have just described is also the Backdoor Survival mindset. And while I would like to think that it is the very best description out there, I am not arrogant enough to think that what works for me will work for everyone. But – and you know how I like to do this – whether you are an experienced prepper or a newbie that is just beginning to get your toes wet, you need to think about your own personal Survival Mindset and move to a survival place that meets your own needs.
Okay. Enough said about that. Let us begin with 12 Months of Prepping: Month One.
MONTH 1 SUPPLIES & GEAR:
- Water-3 gallons per person and per pet
- Hand-operated can opener and bottle opener
- Canned meat, stew, or pasta meals – 5 per person
- 2 flashlights with batteries
Let’s talk about water first.
Have you ever woken up in the middle of the night with an unquenchable thirst? That thirst is a signal that your body is dehydrated and is lacking a sufficient quantity of fluids to function.
When this occurs, the blood in your body is compromised. More succinctly, it gets completely whacked out. And the result? In addition to increased thirst, dry mouth & throat and chapped lips, all of which are annoying, there is a risk of lethargy, dizziness, decreased urine output, constipation, migraine headaches, wild fluctuations in blood pressure, rapid heartbeat and ultimately, lack of consciousness. Much more, at this point, than a mere annoyance, this can, in fact, be life threatening.
So how bad really is dehydration? Back in 2001 I ended up being carted to the hospital by the local EMTs as a resulted of dehydration caused by food poisoning. My husband thought he was losing me; and was not feeling so great myself. it was not a pleasant experience.
So yes, think about water storage now and make it your number one priority.
There are a lot of ways to store water. You can purchase a 55-gallon barrel, you can stock up on bottled water, or, if money is tight and you are willing to do a little work, you can clean and fill some empty soda and juice bottles with water from your tap and store them someplace cool and protected for up to six months. I have written an article on do-it-yourself water storage which you can go back to if you need some guidance with your water storage: Survival Basics: Water.
The next items on the list are related: canned goods and a manual can opener. The goal here is to put away some food items that you enjoy, that require minimal cooking, are tasty and – here is the rub – are calorie dense. This is not the time to worry about the very best in low fat, diet-friendly foods. What you are looking at are foods that are going to feed your body with energy.
Have you ever analyzed the contents of M.R.E.’s? (If you are not familiar with that term, M.R.E. stands for “Meal ready to eat” such as the precooked and prepackaged meals used by military personnel in combat.) Many such meals seem tiny in quantity by today’s standards and yet the total calorie count, per meal, is up to 1,200 calories or more.
The moral of this lesson is that in a crisis or emergency situation, your body needs fuel and fuel means calories. As you are planning your canned food storage items, think calories and lots of them.
One of the easiest ways for a beginner to tackle their initial food storage needs is to open up their cupboard or pantry and raid the contents. And for the more experienced prepper? You are still going to want to take a peek in your cupboards and take a look at the foods you are currently eating and hopefully enjoying. Have you included these with your existing supplies? What better time than now than to go take a look. Pick and choose some new items and add them to what you already have.
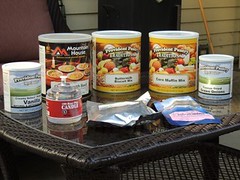
Here are some of the canned and prepared food items that I personally have stored away in my survival pantry:
- Canned chicken
- Canned beef
- Canned Soups
- Canned beans
- Canned chili
- Mac and Cheese
- Peanut Butter
- Pilot Crackers in a tin
For a more thorough list of ideas of food items to store for an emergency, see 20 Items to Kick Start Your Food Storage Plan. Keep in mind, however, that this is only month one of the 12 Months of Prepping, and you do not need to stock your entire food pantry at once.
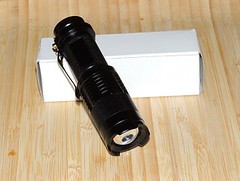
In addition to food, we have flashlights and batteries on our list of Month One supplies and gear.
This is one area where you are going to want to do a bit better than your 99 cent flashlight from the Dollar Store. Not that I don’t love those little LEDs that cost just a dollar each, but in a power outage, you are going to need something a bit more powerful. I happen to like the Eveready lantern-style flashlights that can be modified so that they last a full 2000 hours.
I also own a number of heavy duty tactical-style flashlights which are dependable and heavy enough to also be used as weapons. If you have a few extra dollars, then by all means get a few of these Mini Crees from Amazon and stash them around the house, your vehicles, and your handbags and backpacks. You can never have too many flashlights.
And then there are batteries; you are going to want to have lots of batteries. It is all well and good that you are a good steward of our planet and use rechargeable batteries but trust me, in a power out, grid down situation, you will be thankful that you have a healthy supply of standard alkaline batteries as well.
MONTH 1 TASKS:
- Inventory the disaster supplies you already have on hand, including your camping gear
- If you fill your own water containers, mark them with the date they were filled
- Date cans of food and food containers if you have not already done so
The first task in Month One is to inventory your existing supplies, especially any outdoor or camping gear that you may already own. What I did when I first got started prepping is walk around the house, yard and garage, taking note of items I had on hand that could be used if the power were out, if a natural disaster or storm shut down the roadways, or if there was some other crisis.
Here is a list of some of the things you can look for as you undertake a walk-around inventory. This is not a comprehensive list, just some ideas to get you started.
- First aid supplies
- Warm blankets
- Outdoor cooking facilities
- Cooking fuel
- Knives, hatchets and saws (for cutting away brush)
- Hiking boots
- Self-powered radio gear
- Sleeping bags & tents
- Lanterns
- Firearms and self defense items
Remember, at this point we are merely taking an inventory so you can assess any gaps in your gear and begin thinking about the purchases you will need to make in future months. You can also use this time to note the condition of the gear you have on hand and make repairs if any are needed.
Note: Next month we will talk about assessing specific risks so you can better plan for mitigating the consequences of those risks. For now, however, the important thing is to simply take stock of what you already own.
The final task for Month One is to get out those Sharpie’s or other permanent marker and note the date you filled your water containers and the date you purchased the food you set aside for emergency use. Many will argue that you should mark everything with the expiration date but to my thinking, you need a PhD in code breaking to understand those expiration dates that appear on cans and packaged food.
I feel you are much better served by focusing on an effective rotation system – first in first out – using the approximate purchase date as a rough guideline. Couple that with rotating food and water twice a year when you change the clocks for daylight savings time and you should be all set.
The Final Word
The very first month in implementing a preparedness plan does not have to be difficult, nor does it have to be time consuming or unnecessarily expensive. Please, whatever you do, do not get frustrated. There is a lot of support in the online community, including the kind folks that visit this website. Ask a question and surely someone will reach out to help with an answer; if not here then on Facebook or one of the other social media platforms.
And what if you are a more experienced prepper? What better time than now to go back and review your progress and perhaps share your experience with an unenlightened family member or a favorite friend. Send them a copy of this article and help them formulate their own survival mindset and preparedness plan.
Be patient and gentle with them if they don’t at first understand. In the long run, they will thank you.
Enjoy your next adventure through common sense and thoughtful preparation!
Gaye
Click Here To Vote For Me at Top Prepper Websites!
If you have not done so already, please be sure to like Facebook which is updated every time there is an awesome new article, news byte, or link to a free survival, prepping or homesteading book on Amazon. You can also follow Backdoor Survival on Twitter, Pinterest, and Google+ and purchase my book, The Prepper’s Guide to Food Storage from Amazon.
~~~~~~~~~~~~~~~~~~~~
From the Bargain Bin: Today I am sharing links to some of my own personal prepping purchases.
FordEx Group 300lm Mini Cree Led Flashlight Torch Adjustable Focus Zoom Light Lamp: Here we go with another flashlight. It is super mini sized, bright and waterproof. Plus, it uses a single, standard AA sized battery.
Morakniv Craftline Q Allround Fixed Blade Utility Knife: Also known as the Mora 511, this is now my favorite knife. It is made of Swedish steel and is super sharp.
LifeStraw Personal Water Filter: The LifeStraw is considered the most advanced, compact, ultra light personal water filter available. It contains no chemicals or iodinated resin, no batteries and no moving parts to break or wear out. It weighs only 2oz. making it perfect for the prepper. There is also a larger sized LifeStraw Family currently available with free shipping. For more information, see my LifeStraw review.
 The Prepper’s Guide to Food Storage: My eBook will provide you with everything you need to create an affordable food storage plan, including what to buy and how to store it. Nothing scary and nothing overwhelming – you really can do this!
Eveready 3-LED 6Volt Floating Lantern (battery included): I don’t know how long it will last but there is currently a great price on this LED lantern-style flashlight. (If you are planning to build a 2000-hour flashlight, this is the one that you need – see next item.)
The Amazing 2000-Hour Flashlight: This short little book will give you detailed instructions for adding a cheap resistor to a cheap flashlight and create a light that produces useful illumination for 2000 hours on the same battery. (And I wrote the forward!)
Rothco 550lb. Type III Nylon Paracord: As far as I am concerned, paracord ranks up there with duct tape and zip ties. I wish I had know about this stuff years ago.
Volcano II Collapsible Cook Stove: I love my Volcano Stove. So easy to use and it folds up to nothing in its own carry bag. For a review, read Survival Woman Review: Volcano Collapsible II Stove.
Lodge Logic 12-Inch Pre-Seasoned Skillet: This purchase changed the way I cook. I use my cast iron cookware for everything from salmon, to bacon and eggs, to biscuits. For under the modest cost, there is not excuse not to own this survival basic. Don’t forget the Lodge Set of 2 Pan Scrapers, a must have for cleaning those food bits from your cast iron cookware.
________________________
Shop the Emergency Essentials Monthly Specials: The monthly specials at Emergency Essentials feature discounts of up to 35% off sometimes a bit more.
Recent purchases from Emergency Essentials
The monthly specials at Emergency Essentials feature discounts of up to 35% off sometimes a bit more. I have a monthly budget and each month I add a bit more freeze dried food and other products to my long term storage – always making my selection from sale items.
There are a lot new items that are put on sale each month – be sure to take a look.
Note: I earn a small commission on your purchase making this a great way to support Backdoor Survival which will always be free to everyone.
Shop the Emergency Essentials Monthly Specials
________________________
I earn a small commission from purchases made when you begin your Amazon shopping experience here.
The Amazon Top Ten Most Wanted Survival and Outdoor Items
Emergency Preparedness Items from Amazon.com
Help support Backdoor Survival. Purchases earn a small commission and for that I thank you!


33 Responses to “12 Months of Prepping: Month One”
Wanted to say thanks for doing a refresher on getting ready. We recently had a multi-day power outage which made us use a lot of items I had stored. It also pointed out where we need to improve, so going back to basics is a good thing.
Andrea – If you have the time, I would love to learn about those areas that need improvement so that we all could learn from them.
@Melanie – No worries. We have a case of Kraft and some freeze dried. I think the FD is Mountain House. I have found that the generic store brands are awful; then again, if you were hungry enough . . .
Lucky for us, that’s the kind we like!! (Store brand mac-n-cheese, w/in reason. Dollar Stores? Uh uh!)
BTW, Aldi’s is starting to make themselves known, at least in the mid-Atlantic area. They ROCK w/ their canned goods! Yeah, veges aren’t the pick of the lot but when you’re hungry and you have MORE food because you didn’t demand Del Monte or Green Giant, you’re just as fine w/ second pick. Salad dressings, yogurts, lunch meat and meat – eh, no. But check it out, crackers and such are pretty good too, some are name brand and their Pop Tarts are BETTER than The real Pop Tarts – more filling, more frosting. Snack bars/breakfast bars/whatever, are just as tasty as well. Watch the sell by dates tho, in this situation, otherwise day-to-day you should be fine.
I’m new to your site and navigating is kind of confusing. Like, where is Month 2, 3, 4, etc.?
This page has links to the complete series: //www.backdoorsurvival.com/12-months-of-prepping-year-one/.
I know that I need to work on site navigation. So much to do, so little time.
Maybe this should be obvious and I feel a little silly asking it. You mentioned Mac and cheese in your food storage. What type do you store and how do you store it?
No pilot crackers for me.
Sealed in a mason jar using a jar sealer and a vacuum sealer.
Even have ritz crackers!! Yummm.
Crackers in a mason jar.
Jay – How about some oreos, too? Comfort food is important 🙂
ha! what makes you think they’d LAST long enough for the sh-t to hit the fan?
Just adding a cautionary note. As you plan about your can goods. Please remember you cannot use the cans as cooking pots. Most if not all canned goods have tins which are lined in plastic. You don’t want that plastic melting into your food.
I like your description of the Backdoor Survival mindset quite a lot.
I came across a blog entry about rainwater collection and using it with a rooftop garden type of setup that was a little more serious than most I’ve seen. I thought you all might find it interesting. It sure seems like something to work towards (or even parts of it) or just to get ideas from, and it definitely fits into the Backdoor Survival mindset:
//mindbodypolitic.com/2014/02/11/rain-water-harvesting-green-living-on-a-bangalore-roof/
Also, in the article about LifeStraws I noticed this, “the LifeStraw has a shelf-life of five years”.
What happens after the five year mark? Does the filter get brittle and decompose or something? How do you determine if a filter is no longer useful? Is there a way to prolong it’s shelf life? I.e. put it in can of vinegar?
After reading your comment, I contacted the US distributor for LifeStraw. Here is what they said:
“The shelf life comment on LifeStraw products have actually been removed. The reason for this is because the filter has no chemicals or moving parts, meaning that there will be nothing that can expire.
When the LifeStraw reaches capacity, you will be unable to draw water through the unit. To prolong the life, what you will need to do is to back flush the unit after every use. You can even hold the LifeStraw under the sink and use your faucet to back flush all the contaminates caught within the pores. To do that, you will need to hold the LifeStraw under the sink and use your hand to seal off the top, so that you get water pressure through the straw to back flush.”
Now I need to go back and update the article. Thanks for the question.
My pleasure.
And, thank you too for looking into that.
It’s very good to know.
Very.
great way to start the year with a refresher course
This article is perfect! My family of three is just starting on our road to being prepared, and it is all very overwhelming. The hubby was hesitant to get started because money is tight right now. Your guide makes it less overwhelming and more financially doable. Our biggest challenge will be figuring out where to store everything. We live in a 530 sq ft rental house and space is pretty limited. I’ve been thinking of installing shelves a foot down from the ceiling on every available wall…
Tina – remember that you can also store under most beds. If not already full you can use the bottom and top of closets. I’ve also seen where people made furniture ( coffee table/end table types) cheaply and stored in them. Also, if you have a car you can put some things in the trunk of it. You’ve already answered the question of whether (in an emergency) you are going to take care of yourself and your family, or wait for the government to eventually get to you. This is also known as responsibility! Congratulations, on the decision and having a husband who agrees with you. Keep reading BackDoor survival and you will learn a lot of useful things!
Tina – Here is an article that might help: 16 Food Storage Tips for the Space Challenged Prepper
//www.backdoorsurvival.com/food-storage-tips-for-the-space-challenged-prepper/
My husband and I live in a 1-bedroom apartment with a small about 8*5 storage locker down the hall. A great trick is to use the highest shelves that already exist, like the cupboard above a fridge nobody who isn’t a giant can reach, or even above the cabinets if they’re not ceiling height. Making sure the “normal” things you own are organized helps you see space to use.
Big rubbermaid storage containers stack, so if you can clear even one closet you can then fit a bunch of stuff in some of them stacked high.
Those shoe boxes for $1 are awesome. That space at the top of the shelves in closets can be used.
Thanks for all the awesome tips and help!
There are risers which are made to raise beds about 5 inches higher. Not only do my beds have these but I took the legs off my couch (they would work with how I did this)and raised it about 5 inches. I added a skirt around the couch and, for now, I’m using boxes which are cut down but will store normal sized cans upright. So, when I shop, what’s new goes under, what’s under goes to the kitchen in the back of the lower cupboards, what is down there, gets rotated to the cupboards used daily.
There are times when someone entering my kitchen would believe I didn’t have much food. That’s ok. I actually encourage that belief. Only trusted people know I have more. AND did you know, if you pull out your dressers just a bit, you can stack TP, paper towels and other items behind THEN you can put your decorative stuff on those shelves you want on the walls. As Gaye says, do an inspection of your home and grounds, you’ll be surprised at the space you have. BTW: Try to store items in separate places so it’s not a grocery store if someone breaks into your home.
Hi Gaye and Survival Hubby, Today I made my second batch of Miracle Salve this morning. I gave away a couple of jars of the first batch and those that got them loved it. I added some tree oil to this batch to see how it works. Might not like it as well, but gotta experiment. Will let you know how it goes. Thanks for all your great ideas.
Hi Gaye, just wanted you to know how much I appreciated your 12 months of prepping when I first started. Being a logical and linear ‘planner’ the whole prepping thing had my mind boggled initially. Plus DH was adamant we do everything now! So this schedule helped me calm down, take a deep breath, and move forward.
When I meet someone new to prepping, I tell them to start with your site and the 12 month list. At this point, after about two years now and for a family of 8, we have food for 6 months, water for 3 months, a ham radio and license, an increasingly well supplied medical kit (and skills), a 1500 SF garden, 6 chickens and 2 goats, 2 pistols, a rifle, ammo for all, and lots of new skills.
I couldn’t have done it without your help, thank you so much!!
Greeneyes