
This site contains affiliate links. As an Amazon Associate, I earn a commission from qualifying purchases at no extra cost to you. Full Disclosure Here.
A few weeks ago, I received an email from a Backdoor Survival reader asking my opinion on a device she had seen being promoted to preppers. It was basically a vacuum sealer that could be used to seal up packages of dry foods. Holy moly! I could hardly believe that someone would consider something like this when a less expensive FoodSaver would do the same thing. Plus a Foodsaver can be used for frozen items too. There is no better way to prevent freezer burn.
They are also excellent for marinating and sous vide style cooking.
I have had a FoodSaver for years. I use it for all sorts of soft and dry goods, such as cheeses, meats, specialty flours, and even things like coffee beans and tea bags. It works great. The surprising thing, however, is that at least half of the time, I don’t bother with the bags. Instead, I use Mason jars.
Without further delay, here is how to use a FoodSaver…

You have seen me talk about my sealed canning jars many times in the past but I have never gotten around to telling you about them in detail.
Enter contributing writer, Rob Hanus, who has done all of the work for me. In today’s Fast Track Tip, Rob will explain how the FoodSaver canning jar attachment works in words while I show you how it works in pictures. (And by the way, those M&Ms make for great comfort items while hunkering down for whatever reason!)
Vacuum Canning Using a Food Saver Jar Sealer Attachment
Thanks to the numerous infomercials, there is hardly a person in the US that doesn’t know what a vacuum sealer is. The most common being the Food Saver units. You’ll find that even people that aren’t preppers will have these in their home. Vacuum sealing works great for keeping food fresher, especially in the freezer. To get an idea on how long you can keep some foods, check out this recent blog post: How Long Do You Freeze Food?
If you have ever used a vacuum-sealer, you know that one of the pitfalls of using one is having to buy more bags. Even when you try to save a little money and buy the rolls of bags, you still have to spend time cutting them and sealing one end before you can even use it. And washing the bags doesn’t work as well as it would seem it should.
However, there is something that you can do to vacuum-seal food without having to buy replacement bags. It’s not a complete replacement for using the bags, but in some ways, it can be more efficient.
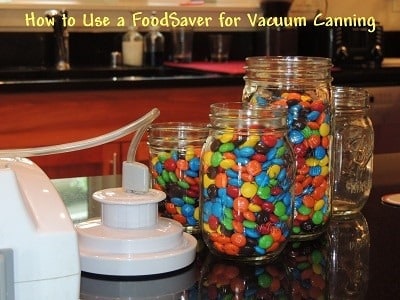
Getting it all set up. Note the canning funnel.
I’m referring to the jar sealer attachment. There are jar sealer attachments for both wide-mouth and regular-mouth jars. Mine came with the wide-mouth and we bought the regular-mouth. This is a good investment as it allows you to use both sizes of jars.
Using the jar sealer is as simple as sealing a bag. To set up, you place the hose into the sealer and the other end into the top of the jar sealer attachment. Next, fill your jar with the item you’re going to seal and place the lid on top. Don’t put the ring on yet, though. With the jar sealer connected to the vacuum sealing unit, place the attachment over the jar and firmly seat it on top. Then, press the button on the sealer unit. The air will be sucked out of the jar and when the light goes green, release the button. When you’ve confirmed that there is a vacuum, then you can put the ring on.
The vacuum that is inside seals the lid onto the jar. If the lid is damaged, it might slowly leak air back in, so use only lids that aren’t damaged or have holes. However, the great thing about vacuum-sealing these jars is that you can reuse the lids. Because you’re not heating them up, the sealing compound on the lid isn’t destroyed, like in normal canning. So long as the lid holds the vacuum, you can reuse it.
To ensure a good seal, hold the jar attachment down during the sealing cycle.
A nice tight seal!
Done! A batch of Backdoor Survival Tranquilizers for when the SHTF!
Because there is no bag crushing the contents, you can seal items that are fragile or easily crushed. It’s also quite easy to reseal, so keeping your bulk herbs and spices just became a lot easier. After you (carefully) open the lid and take out the amount you need, just run the sealer and it’s vacuum sealed again!
One of the things we use this quite a bit for is freezing homemade soup and tomato sauce. The lack of air extends the amount of time you can keep the food in the fridge for freezer. Just remember that vacuum sealing isn’t like water bath or pressure canning and most things will need to be kept in the refrigerator or freezer.
Fun Tip #1: Marinade meat in record time. Putting your meat in the jar along with your favorite marinade and vacuum-sealing it will cut down the amount of time you need to marinade. The vacuum allows the juices to penetrate into the meat much faster. What used to take hours now takes about 20-30 minutes.
Fun Tip #2: Put a handful of marshmallows into the jar and have your kids watch as you vacuum seal it. The marshmallows will expand! This one never ceases to amaze my kids. The air in the marshmallows expands in the vacuum, which in turn makes the marshmallows bigger. If you leave them in there for a while, though, or if you open the jar, they will shrink again. Great way to teach science to your kids!


About Rob: Rob Hanus frequently posts original podcasts on his website at the Preparedness Podcast. He also is the author of an eBook, the Preparedness Capability Checklist which can be purchased from links on his website. His podcasts are informative and his Prepper News Watch is the best. You can bet that his book is good as well.
What About an Oxygen Absorber?
When packaging dry goods in a mason jar, I use an oxygen absorber. Why do I do this? Whereas the FoodSaver reduces the amount of air inside your mason jar, it does not remove all of it. By adding an oxygen absorber, you know that the oxygen will be reduced to almost nothing; thus preventing mold and spoilage.
For a pint sized or quart sized jar I will use a 100 cc packet. They cost about 10 cents each and I figure that this modest expense provides an extra cushion of freshness, especially if my vacuum canned dry goods will sit on the shelf for longer than a year or two.
Looking for the Best Vacuum Sealers?
The FoodSaver is a fan favorite, but it’s not the only vacuum sealer on the market. In fact, there are many other competent options. You can read my top recommended list of food sealers here.
Additional Tips
Something that Rob did not mention is that it helps to leave a bit of head space in the jars. I don’t know why, but if you overfill a jar, it will not seal. Likewise, regular mouth jars seem to seal more successfully if you use two lids. One lid gets sealed to the jar and the other acts as a shim that can be used again on another jar. Again, I don’t know why this works but it does.
Another good use for the jar sealer attachment is storage of unused oxygen absorbers. By storing the unused packets in a sealed jar, you can pretty much guarantee that they will still be good the next time you have a food packaging session.
The Final Word
As much as we prepare for off-grid situations, we still need to live our lives in the here and now. There is no shame in using modern, 21st century conveniences. That is why I promote the use of Crockpots, Automatic Bread Machines, and Food Savers.
Does this mean I do not know how to bake bread from scratch the old fashion way? No, of course not. Nor does it mean I do not know how to cook with my cast iron Dutch oven over an open fire. I do and do it well, mind you.
In using modern conveniences to save time, we carve out those extra hours needed to learn other survival skills such as fire-making, hunting, fishing, sewing, gardening and a myriad of other things that may be handy down the road. Personally, I think it is worth it.
Be sure to also check out the Pros and Cons of freeze drying your own food here. It’s definitely something to consider in addition to vacuum sealing.
Enjoy your next adventure through common sense and thoughtful preparation!
Gaye
New: Click Here To Vote For Me at Top Prepper Websites!
If you have not done so already, please be sure to like Facebook which is updated every time there is an awesome new article, news byte, or link to a free survival, prepping or homesteading book on Amazon. You can also follow Backdoor Survival on Twitter, Pinterest, and Google+ and purchase my book, The Prepper’s Guide to Food Storage from Amazon.
Bargain Bin: Today I share some tools and supplies for using a FoodSaver to vacuum can your emergency food. For help with your food storage questions, my new eBook: The Preppers Guide to Food Storage.
FoodSaver Vacuum Sealer: As long as the unit has an accessory port (and this one does), and inexpensive FoodSaver will work just as well as the fancier models. That is my two cents, at least.
FoodSaver Wide Mouth Jar Sealer: Already have a FoodSaver? If so, check out this jar sealer which can be used to vacuum seal your Mason jars. This is a great option for short to mid term storage of items such as beans, rice, sugar and salt. Store your jars in a cool, dark place and you are set with the added advantage of removing a small amount for current use without having to disrupt your large Mylar bag or bucket of food. There is also a version for regular sized jars.
100-Pack Oxygen Absorber, 100cc: I always have these available. At less than 10 cents each, I consider adding a 100 cc oxygen absorber cheap insurance that ensures that my vacuum sealed food will remain nice and fresh – even five years later.
Sharpie Permanent Markers: Sharpies were invented for preppers! And without question, Amazon is the cheapest place to buy them.
VacMaster 3 1/2 Mil Vacuum Bags Combo Pack, 60 Count Box: I prefer these over the make-it-yourself FoodSaver brand bags. I have been using these for years with great luck. To re-use them, I turn them inside out and wash them in the dishwasher.
Mylar bags & Oxygen Absorbers: What I love about Mylar bags and oxygen absorbers is they protect against every single one of the food storage enemies. Prices do vary but for the most part, they are inexpensive and easy to keep on hand. And while you can seal them up with a FoodSaver, some tubing and a common clothes iron, I find it infinitely easier with a cheap hair straightening iron that you can pick up for very cheap.
The Prepper’s Guide to Food Storage: My eBook will provide you with everything you need to create an affordable food storage plan, including what to buy and how to store it. Nothing scary and nothing overwhelming – you really can do this! Now available at Amazon.
Shop the Emergency Essentials Monthly Specials: The monthly specials at Emergency Essentials feature discounts of up to 35% off sometimes a bit more.
One item I can recommend available is their Do It Yourself SuperPail Combo![]() .
.![]() It includes 6 x 6-Gallon Buckets with Lids, 6 x Metallized Storage Bags and a 10-Pack of Large Oxygen Absorbers.
It includes 6 x 6-Gallon Buckets with Lids, 6 x Metallized Storage Bags and a 10-Pack of Large Oxygen Absorbers.

Don’t forget that you do not need fancy equipment to seal the metalized bag. A cheap hair iron will do the job.
The Amazon Top Ten Most Wanted Survival and Outdoor Items
Emergency Preparedness Items from Amazon.com
Help support Backdoor Survival. Purchases earn a small commission and for that I thank you!


65 Responses to “FoodSaver Canning: A Fast and Easy Food Preservation Method”
Can you the food to kill bacteria then vacuum seal it instead of canning?
Thanks for the information sealing jars with the food saver. I am considering getting a food saver. Just trying to decide what size is best for us.You have been very helpful.
Thanks for the information concealing jars with the food saver. I am considering getting one. Just trying to decide what size is best for us. Thanks for all the information,very helpful.
To can fresh fruit and vegetables you are going to need a pressure canner. No if or buts about it. On the other hand, a food sealer is great for “dry canning” bulk food items.
I do not make my own food saver bags. Instead, I purchase pre-made bags on Amazon. I think there is a link for those in the bargain bin. Beyond that, however, I use mason jars as you have suggested. Just be aware that fresh foods need to be refrigerated or frozen after sealing.
Enjoy your new food sealer!
HI< i just started with my food SEALER, WANTED TO KNOW IF IT IS OK, TO USE IT FOR CANNING FRESH FRUIT AND VEGGIES ETC . AND WHAT IS THE BEST WAY TO DO THEM I REALLY DON;T LIKE THE BAGES THAT YOU HAVE TO MAKE CAN I USE THE JARES INSTEAD OF THE BAGES STARTING OUT NEED ALL the help i can get thank you very much
ok so i am a little late to the party, but i got one of these seal a meals with the food saver jar attachments for christmas. I do a lot of canning in the summer and fall. Potatoes, apple butter, apple sauce, and items like that. Can i use this attachment to seal these for the pantry? Or do i need to just go buy a new stove since i have a glass top stove and can no longer can on it due to possible cracking of the glass from the canning?
Hilary – No!! The Foodsaver is great for storing pantry items and bulk foods but it absolutely does not preserve canned goods for long term storage. Those must be heat processed.
Looks like you need a new stove although I know of people who do their canning outdoors on a Coleman grill. That might be a less expensive option for you.
Just buy one of those single countertop burners.. and use it for canning… and as an extra burner… I like the Infrared burners… problem solved..
If I use the Foodsaver to seal jars containing cinnamon, baking soda, dehydrated potatoes, brown sugar, powdered sugar, or other dry goods will the hose get plugged? I am just starting this new adventure. What items should I put an oxygen absorber in for longer storage? Thank you!
Using the jar attachment, the hose is protected from and does not come in contact with the food items. So no, it will not get plugged.
You do not want to use on O2 absorber with salt, sugar or sprouting seeds. Other than those three items, you are good to go and can/should use an oxygen absorber with other bulk items.
I’ve used the Foodsaver to seal canning jars. However, you can use it also to seal dry goods in recycled jars that have the safety button in their metal covers (just to be sure the seal takes and holds).
If you have a large food saver canister (found a lot at thrift stores), you fill your recycled jar, tighten on the cover, and place in the food saver canister. Vacuum seal the canister. I usually wait a few seconds. When you release the vacuum, listen for that distinctive “ping” of the safety button. I have pinto beans sealed in recycled pasta sauce jars that are still sealed over a year later.
I have had good luck sealing mason jars using just an oxygen absorber without the Foodsaver attachment. I sealed a bunch of jars of beans a few months ago and the seal is still holding. I am not, however, recommending this for the long term (over a year) until I can do more testing. Still, its a thought.
Any idea how long dry items will last in a vacuum sealed jar? Things like dry brown rice, lentils or beans? I don’t store them in the fridge. Just on the shelf. Is there a chart somewhere that maybe tells what the shelf life of these sorts of foods are? Thanks!
There are many factors involved including storage conditions (in a hot garage?) and whether or not you use an oxygen absorber. As a rule of thumb, I personally try to use my vacuum sealed dry goods within 3 to 5 years. Beyond that, I seal in Mylar bags and buckets.
Two things. First, this is the formula I came up with and so far, it has worked out well. My jarred items are still usable after 4 years. Second, I have read that even with perfect storage conditions, legumes will turn hard after a long period of storage and will need to be softened with a pressure cooker before they become usable. My own food storage is less than 10 years old so I have no way of verifying this myself.
Here is an article for you: //www.backdoorsurvival.com/how-to-use-a-foodsaver-for-vacuum-canning/.
I have the jar sealer, so I don’t know why it never crossed my mind to use mason jars for my almond flour and coconut flour. How long do you think they will last when sealed?
I add an oxygen absorber to my jars of dry goods before sealing them with the FoodSaver Jar Sealer. I started doing this about six years ago and so far so good. I know this because I have used flour and beans that were stored in this manner. My jars are kept in the coolest part of my house which I am sure is also helpful.
Question: I sealed up some tang in a mason jar with my food saver and I put an o2 packet in as well. I looked at it in a week and the top of the package was hard and the o2 packet was in there. The jar sealed fine. Wonder what would cause the sugar to melt?
One other thing. These days, any one can post anything on the internet. Some of the so-called shelf-life charts I have seen online are off-the-wall bogus. Always consider the source and do your own research.
Thanks so much!
Thanks for all the great tips on this!