

This site contains affiliate links. As an Amazon Associate, I earn a commission from qualifying purchases at no extra cost to you. Full Disclosure Here.
One of the challenges during a power outage is cooking meals. While there are many options, most require cooking outdoors using stove-type methods such as a rocket stove, BBQ grill, fire pit or camp stove. These methods work great, especially if they are coupled with a cast iron skillet or Dutch oven.
The problem, however, is that we can not predict or time when the power will go out. Nor can we predetermine how long the grid will be down; it may be hours or it may be days or even weeks. Not only that, what if the power goes out for a week during the coldest part of the year, with 10 inches of snow on the ground and a howling wind? Cooking outdoors under those conditions is nearly impossible. In addition, unless you are using biomass (twigs and leaves), there are fuel considerations when it comes to availability and cost.

Regardless of the drama, wouldn’t it be nice to have cooking source that you can safely use indoors, rain or shine, with just inexpensive tea lights as a fuel source?
Today I am thrilled to introduce you to the amazing HERC Tea Light Oven. Not only that, one of these fabulous ovens has been reserved for a lucky (very lucky) Backdoor Survival reader. More about that in a moment.
First, Some Background
I first spoke to Kris Johnson, the developer of the HERC oven, a couple of years ago when he requested some feedback on the Titan Water rack system. We chatted back and forth by phone a number of times and kept in touch by email. Last Fall, Kris called and told me about a new, indoor oven that he was working on – an oven that was powered solely by commonly available tea lights.
He called it the HERC which stands for Home Emergency Radiant Cooking. What makes the HERC special? Through design and the use of certain materials in manufacturing, HERC marries heat generated by convection with heat created by conduction and Infrared radiation. It is the combination of IR and convection that allows the HERC to get hot and stay hot while using only tea lights.
Practical Use of the HERC Oven
Whenever I do a review, I have some decisions to make. Do I talk about the technical aspects or do I simply focus on usability in a survival situation? Today I have decided to focus mostly on the practical usage of the HERC oven because, to be honest, my interest throughout the testing was to see how well the HERC performed cooking real food. The other stuff was secondary.
For the past week, the HERC was my only cooking source. My fancy kitchen range was off limits. Here is what I cooked along with a few notes.


3.5 pound Tri-Tip Roast: Yes, I must admit it took guts to cook a $25 roast in the HERC oven. Although it took longer than I expected (3 hours), this was the most tender tri-tip I have ever prepared. The real surprise, though, was that there was no grease or juice splatter at all. The HERC oven stayed pristinely clean and there was no smoking either. Heck, when I cook a tri-tip in my electric oven, I usually have a big mess after the fact. And sometimes, the smoke alarms go off. Really.

Chicken and Rice Casserole: This was the old mushroom soup and rice standard that we all remember as kids.

Oven Rice: If the SHTF, we will be eating a lot of rice because it is filling, has calories for energy and stores well. I made it in the HERC using a ratio of 2 cups rice to 3 cups water. I added bullion cubes and herbs from my food storage, covered the pan and let the rice cook for 90 minutes. With warmed over tri-tip (30 minutes in foil), this was our evening meal.

Brownies: This pan of brownies took 90 minutes to bake instead of the conventional 30, but they too were perfection. You can not tell from the picture but the cooking was even unlike a standard, electric oven where the edges tend to overcook and the center stays mushy. I used a boxed mix that was 5 years old and well beyond its printed expiration date. Moral of the story? Packaged food will last a lot longer than most expiration dates will indicate, especially if stored in a cool, dry location.
Everything I cooked in the HERC emitted the delicious and comforting aroma of well prepared food. As a matter of fact, the brownies baking were a huge distraction from my work – so much so I had to take a coffee break so I could savor the smell and admire the baking process. (The HERC has a nice viewing window so that you can peek inside to see what is going on.)
Basic Instructions for Using the HERC
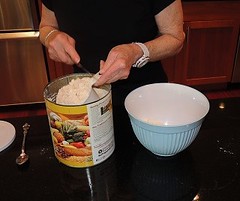
The set up of the HERC was pretty easy. Shelly did it in about 30 minutes but said the next time he could do it in 10. All you need to do to use the oven is load up each of the two tea light trays with 10 tea lights and slide them under the oven. As you can see, we set the oven on top of cutting boards sitting on our counter but I don’t think that was really necessary.

You set your food in the oven by opening the top lid and placing your pan inside. There are quarry tiles on both the oven floor and lid so be mindful of the heat if you happen to touch them. I used Ove Gloves just to be safe. By the way, one surprising aspect of the oven was that is accommodated a 9 x 13 pan with no problem. Good to know and, as a matter of fact, the specs indicate that the HERC will accommodate an 11 x 15 pan.
Cooking Tips – Do’s and Don’ts
1. Preheat for 20 to 30 minutes. That is sufficient. For the tri tip, I made the mistake of using a standard oven thermometer to gauge the pre-heat temperature. It took an hour to register 350~ but then started to fluctuate. Finally, I ignored it and simply allowed an internal meat thermometer to tell me when the meat was done. I highly recommend getting one of these probe type external thermometers. I use mine with my barbeque and smoker – indispensible!
2. Allow plenty of time. A pan of brownies that would take 30 minutes in a conventional oven, took 90. Be patient. This is a slow, but even, cook process.
3. Stock up on tea lights! Each “load” takes 20 lights and although I reused some that were only half burned, in a grid down you will go through a lot candles. At a cost of 5 to 10 cents each, there is no reason not to have a few hundred or even a thousand or more on hand.
4. Be mindful that the interior gets hot as does the lid. Use oven mitts, ove gloves, or some other type of protection to keep your fingers from getting scorched.
5. It goes without saying that you should never leave burning candles unattended. Ever.
A Word About Tea Lights
Tea lights are made in two very different ways. They are either poured into the aluminum cups from a liquefied state OR they are pressed out of a sheet of wax, looking like little hockey pucks and then placed into aluminum cups. Each type burns differently, with the hockey pucks burning hotter than the poured type. It is easy to identify which method was used and in doing so you will have a good idea whether your food will cook faster or slower with “faster” being relative.
The poured candles (cooler candles) look creamy and are attached to the cup because of solidifying in the cup. The hockey pucks (hotter candles) look granular and are not attached to the aluminum cup. The other difference is that some tea lights are slightly taller than others which means they burn longer.
Interesting enough, I checked and my bag of IKEA tea lights (which should also be called dirt-cheap tea lights) were of the hockey puck type. Note that I did not use them for this review so I can not vouch for their performance.
Whatever type of tea lights you have, my suggestion is to cook with them now while you have the luxury of time on your side. Try to purchase both types so that you can choose the type you prefer. Store a bunch of the preferred type (see #3 above) however learn to cook with both types because in a pinch you might only have access to one kind or the other.
The Giveaway!
Update: Sorry – this giveaway has ended.
Ah! Now here is the part you have been waiting for. Titan Readywater has reserved one HERC XXL Tea Light Candle Oven for a lucky Backdoor Survival reader. To enter the giveaway, all you need to do is respond to the following question in the comments area below. This is a fun one.
From time to time, everyone makes a mistake.
What has been your biggest prepping mistake or goof?
I realize this question is not food or cooking related but truth be told, I have made my share of mistakes and hope to learn from yours. As a matter of fact, we all can learn from them.
The deadline for your entry is 6:00 PM Pacific on Thursday, April 3rd. A winner will be selected at random and will be notified by email as well as in an announcement in the Sunday Survival Buzz. The winner will have 48 hours to claim their prize or another winner will be selected.
Note: If you are reading this article in your email client, you must go to the Backdoor Survival website to enter this giveaway in the comments area at the bottom of the article. As with all BDS giveaways, this giveaway is only open to visitors to the website. Email and Facebook entries do not count.
The Final Word
My HERC oven is still sitting in my kitchen; I am not done with it. I plan to continue using it so that I become more familiar with cooking using tea light candles. I also want to experiment with different brands and types of tea lights. Even more important, I want to bake some bread and perhaps even a pizza using some of my food storage items as toppings. I will report the results in a future Sunday Survival Buzz.
Before closing, I would like to thank Kris at Titan Readywater for making this giveaway possible. He has indicated that if you love the idea of the HERC and make a purchase before the giveaway is over, he will send a refund (or a second oven) if you are the winner. Now how cool is that?
Backdoor Survival is blessed to have so many friends that are willing to share their products with you and for that, I am grateful. The reason, I believe, is because Backdoor Survival readers are the best common sense Prepper’s on the planet. Good luck, everyone!
Enjoy your next adventure through common sense and thoughtful preparation!
Gaye
Click Here To Vote For Me at Top Prepper Websites!
If you have not done so already, please be sure to like Facebook which is updated every time there is an awesome new article, news byte, or link to a free survival, prepping or homesteading book on Amazon. You can also follow Backdoor Survival on Twitter, Pinterest, and Google+ and purchase my book, The Prepper’s Guide to Food Storage from Amazon.
Spotlight: The HERC XXL Tea Light Oven! If you love the idea of the HERC and want to make a purchase before the giveaway is over, Titan Readywater will send you a refund (or a second oven) if you are the winner!

Bargain Bin: Below you will find a link to the HERC and to items related to cooking with the HERC Tea Light Oven.
Unscented Tea Lights 100/Pkg-White: Prices vary widely with tea lights, just be mindful of the shipping cost (if any) and the burn time (if states). The following tea lights have a stated burn time of 4-5 hours: Richland® Tealight Candles White Unscented Set of 125.
Taylor Digital Cooking Thermometer/Timer: This is the thermometer/probe that I use. Works great with the HERC in that it remotely displays the food’s temperature as well as the elapsed time.
Ove’ Glove Hot Surface Handler, Pack of 2: I would not be without these. They are light weight and absolutely protect your hands and wrists from oven burns. I put mine in the washer and dryer with no problem. I know see there are some “knock-off” brands that might be worth trying, including these: Oven Glove-Made of Nomex Heat resistant Fiber.
Lodge Double Dutch Oven and Casserole with Skillet Cover, 5-Quart: This cast iron Dutch oven will make a perfect addition to your off-grid cooking supplies.
Wilton 9 by 9 Inch Covered Baking Pan: This is the type of pan I used in my HERC. I also have a similar 9 x 13 pan.
 Shop the Emergency Essentials Monthly Specials
I really love the Provident Pantry Corn Muffin Mix![]() which I cooked up as corn bread in my cast iron skillet. Oh my gosh – it was better than anything boxed that I have ever purchased and as good as home made. The best part is that all I had to add was water! Same with the Buttermilk Biscuit Mix.
which I cooked up as corn bread in my cast iron skillet. Oh my gosh – it was better than anything boxed that I have ever purchased and as good as home made. The best part is that all I had to add was water! Same with the Buttermilk Biscuit Mix.
These are just two of the food storage items that you can purchase at Emergency Essentials. And if you need some recipes? Go to the Food Storage Recipes![]() page of Emergency Essentials for lots of creative (and free) ideas for using the good you have on hand.
page of Emergency Essentials for lots of creative (and free) ideas for using the good you have on hand.
I earn a small commission from purchases made when you begin your .
The Amazon Top Ten Most Wanted Survival and Outdoor Items
Emergency Preparedness Items from Amazon.com
Shop Amazon Tactical – Great Selection of Optics, Knives, Cases, Equipment
Help support Backdoor Survival. Purchases earn a small commission and for that I thank you!
 My eBook, The Prepper’s Guide to Food Storage will provide you with everything you need to create an affordable food storage plan, including what to buy and how to store it. Nothing scary and nothing overwhelming – you really can do this!
Spread the Word – Tell your friends: Share Backdoor Survival with your friends. All you need to do to send them a short email. Now that was easy!


250 Responses to “Off-Grid Cooking with the Amazing HERC Tea Light Oven”
When I moved my family from Texas to Ohio, I didn’t consider the difference in local restrictions or survival knowledge. I grew up with the thought process of your property is your property. Here I can’t do anything, hardly even plant a garden large enough to sustain my family without the gov’t. Getting involved. As for knowledge, I still need to get into touch with the local prepping community to find someone to teach me the local wild edibles… the plant life is so much different here than what I grew up with.
My biggest mistake to date has been my not following explicit directions with the Survival Water Distiller that I purchased. The Directions say to use this equipment outside. I didn’t, since it was still winter up north and I didn’t have an adequate outdoor burner available. I distilled water on my kitchen stove with an electrical burner first set on 6 (until I had spent 20 minutes with just a few drops of distilled water. Then I jacked the heat up to 8 (just shy of highest). That must have burned a lot of electricity to get just 2.5 cups of distilled water. Yet it produced a lot of steam indoors that condenses on cold walls, and can even get inside of walls through electrical switches and receptacles, eventually contributing to mold development if the moisture remains too high for too long inside of walls. So, I learned to follow directions and not cheat the instructions I had read. Then also, the directions said to not leave the area, but did not state why to remain in the area (and the reason why is to listen for when the boiling “hiss” stops, which tells you your bottom pot is now dry). So, I would leave for a few minutes at a time and then come back to examine my measuring cup to see if I was close to the 2.5 cups of distilled water that I was told to expect. Well, the last time I came back I couldn’t hear the “boiling” hiss from the lower pot. I decided the lower pot was probably “dry” (which it was). I quickly turned the stove top off, and learned a second lesson about not following manufacturer directions. There was no damage, but there could have been. I had put 3 cups of water in the bottom pot expecting 2.5 cups of distilled water coming out of it. But I had failed to adequately estimate how much moisture would escape during the warm up time, and during the boiling time (before the distiller is added) and when chlorine, etc. is being evaporated away). This would vary depending upon how much heat I used and how much time was involved (so the manufacturer cannot be precise in estimating this). Next time I will fill the bottom pot 3/4ths full (at least 4 cups of tap water); and then when my distilled water reaches 2.5 cups, I will turn off the heat and let it cool down and proceed with following all directions. But first, I will find or build a high heat outdoor furnace (so to speak)that can heat water fast, and safely. I remain pleased with the product for what I bought it for, but there remains a learning curve that requires practice and some augmentation with additional purchases to the extent that convenience is important to me.
My biggest mistake. Not starting sooner…and when I first started I made some good purchases that wasnt smqrt. If the family wont eat something now…they wont want it when the SHTF! BUY items your family will eat!!
My biggest mistake was buying so many things for my BOB that it takes four BOB’s to hold it all.
Have likely made several real ‘doozies’ I’m not yet aware of… some that do come to mind are: not keeping a more accurate inventory of long term food storage items, not dating the first food preps purchased (causes much guessing re rotation), not doing a more careful job in sealing mylar bags when I first started to repack my bulk purchases. Have learned to be less lazy and more careful now…
but I shouldn’t be too surprised if other “little challenges” arise!
I’m afraid that my biggest mistake will end up not storing enough food. Living paycheck to paycheck doesn’t allow for much. I feel good about shelter (in place), water, fire (cooking), but not much to cook!
My worst mistake is not being systematic about what I need. For instance, I have camping gear and some food, but no water. I have no clear idea of where my gaps are, and I haven’t been getting the most crucial things first.
Biggest mistake….holding out for the BEST deal on product…and then it’s sold out and not available anywhere, at any price. I have learned to be frugal, not cheep!
my biggest prepping mistake was buying all of my wheat and then giving it away twice.
My biggest mistake…wow…how many mistakes? Let me count the ways. I think the biggest mistake was not keeping a good inventory right from the beginning. That would have eliminated a lot of ‘do we have this?’ and avoided a lot of duplication.