

This site contains affiliate links. As an Amazon Associate, I earn a commission from qualifying purchases at no extra cost to you. Full Disclosure Here.
For the past six weeks, I have been exploring alternatives to over-the-counter ointments, salves, and beauty products. Not only are these products expensive, but as I have learned time and time again, they don’t always work.
Starting with a basic formula for healing salve that I found on the internet, I decided to make my own all-purpose salve and to test it on various ailments to see how it worked. I added a bit of this, subtracted a bit of that and came up with I call my own Miracle Healing Salve. The funny thing is that when the final results came in, the formula that worked the best as an all-purpose salve was a version included the same blend essential oils I have been using for muscle aches these past ten plus years. Go figure.
Also Read: Preppers Guide

As easy as this Miracle Healing Salve is to make – and it is easy – it just works. I will share some of the uses that I have become ecstatic about but first, the recipe.
Miracle Healing Salve – The Recipe
Ingredients:
1 Cup Coconut Oil (not fractionated)
1 Cup Extra Virgin Olive Oil
5 Tbl. Organic Beeswax Pastilles
Containers:
8 each – 2 ounce jars or containers **OR**
4 each – 4 ounce mason jars
To each 2 ounce jar add: (double if you are using 4 ounce Mason jars)
5 drops Lavender essential oil
5 drops Rosemary essential oil
5 drops Peppermint essential oil
a few drops of Vitamin E (optional)
1. Put a pot of water on the stove to simmer. While the water is heating, put the coconut oil, olive oil and beeswax pastilles in a heatproof jar or measuring cup.

2. Set the jar filled with the coconut oil, olive oil, and wax into the water and leave it there until it melts, giving it a stir from time to time. You want a slow, gentle melt so take your time. It could take 15 or 20 minutes depending on the temperature of the water bath.

3. While the ingredients are melting, drop your essential oils into each of the containers. Hint: I have found that it is easier to use a glass medicine dropper than the dropper that comes with the bottle of essential oil. This is optional and a matter of personal preference.

4. Pour the melted oils into each of the smaller jars containing essential oils. There is no need to stir unless you want to since the oils will mix up on their own.

5. Cover the jars with a paper towel or cloth and set them aside for up to 24 hours. Although the salve will start to firm up within minutes, it takes at least 12 hours to complete the firming process. (The purpose of the cover is to keep out dust, bugs and other nasties that may be floating around.)

A Word About the Ingredients
Coconut oil is a natural moisturizer and is antibacterial. Olive oil is chock full of antioxidants and has anti-inflammatory properties.
Lavender is a natural antibiotic, antiviral, antifungal and antiseptic. It is a master healer that also helps to prevent scarring. Rosemary is also antiseptic and an excellent treatment for muscle aches. Peppermint is an anti-inflammatory and is also antiseptic. Are you seeing a pattern here?
The optional Vitamin E is an antioxidant and is also used as a natural preservative.
10 Ways (So Far) to Use Miracle Healing Salve
These are the ways I have used this salve with success. I am sure there are others that are yet to be discovered but these make a darn good start!
1. Hand and foot moisturizer: An unbelievably emollient hand and foot moisturizer. No more dry hands and feet.
2. Relief for nocturnal foot and muscle cramps (rub on the bottom of your feet and on your calves before going to bed – this really works!)
3. Eliminates symptoms of eczema and psoriasis: With the addition of 5 to 10 drops of Melaleuca oil (tea tree) to a jar of Miracle Salver, the patch of psoriasis on Shelly’s elbow has all but disappeared. In the past he has tried everything including diet changes and prescription drugs. It has taken about 3 weeks for the Miracle Healing Salve to do its thing. Gone are the ugly crusty patches.
4. Antiseptic Ointment for life’s little bumps and bruises: Instead of Neosporin, reach for Miracle Healing Salve to both soothe and heal cuts and scrapes.
5. Promotes healing of scars: Slather the Miracle Salve over new scars and watch them heal in days rather than weeks. You can barely see the scar from my recent surgery. It is no longer tender, red and angry looking.
6. Makeup Remover: Smear on your face the wipe away your makeup with a damp washcloth.
7. Facial moisturizer and serum: Yes, really. You would think it would be greasy but the oils absorb quickly and leave your face with a nice, dewy texture.
8. Cuticle and nail conditioner: No more ragged cuticles or dry, splitting nails. This is a byproduct of being diligent about #2. It just happened without my realizing it.
8. Hair serum: A few drops liquefied in your palms and then smoothed over your hair will leave it shiny and less fly-away.
10. Relieve pet scratching and itching: Tucker the Dog was scratching himself in one spot on his belly so I put a little Miracle salve on the spot and a couple of days later he stopped. Was it the smell, the healing properties or just a coincidence? I don’t know but it worked.

Items replaced by Miracle Healing Salve
Wild Plant Version of Gaye’s Miracle Healing Salve
By Donna Schott
A number of years back, I found Gaye’s recipe for an essential-oil based DIY Miracle Healing Salve that she found effective on everything from cuts and rashes to sore muscles and eczema. I made the recipe, and have been using it ever since as my go-to first aid salve, replacing Neosporin, Cortisone, aloe vera gel, and other relatively pricey products from the local pharmacy.
In a survival or bug-out situation, however, essential oils may not be available. Once your existing stock runs out, it could easily become difficult or impossible to replace them. That’s why knowing a few common wild medicinal plants can be a life-saver.
A whole array of plants with medicinal qualities grow commonly in yards and urban areas, giving you a surprising bounty of raw material to make your own DIY Miracle Healing Salve even without any essential oils.
Using Common Medicinal Backyard Weeds
To help you be able to make your own medicine regardless of essential oil availability, I’ve re-imagined Gaye’s original recipe with some of these common medicinal backyard weeds. I have listed a number of plants for the ingredients that all have similar healing qualities, so finding and using any combination of them will make a potent salve.
If you’re in a survival situation and don’t have coconut oil, you could make a liquid rub with olive oil or any other fat that is safe to spread onto the skin. You could conceivably even process animal fat for this purpose.
The thing I use this stuff for most is mosquito bites, which I get all over my body in the form of itchy red welts. Mosquitos are a scourge during southern summers, and aside from a momentary cooling sensation, nothing I’ve ever bought at the store seems to help the itch.
After rubbing on a generous amount of this wild plant-based miracle salve, on the other hand, I completely forget about the bites after about five minutes. The itch is erased.
I use it in any of the ways I’d use Gaye’s original healing miracle salve: cuts, scrapes, wounds, boils, rashes, you name it! After giving some of it as a gift, I even got feedback that it helped relieve itching associated with menopause. It’s also pet-safe!
Ingredients:
- 3-4 cups coconut oil
- Half a teaspoon of olive oil infused with vitamin E (optional, but adds nutrients and acts as a preservative)
- 5 tablespoons beeswax
- 1-2 cups slightly crushed medicinal leaves and flowers
Medicinal Plants:
Below is a quick listing of the plants that you can use, with some identifying characteristics and images. Look for these in your yard and around your property, and you’re likely to find many of them just beyond your door. They even grow in parking lots!
For details on the medicinal properties of each of these, take a look at this great resource. I’d expect a salve that used any combination of 2-4 of these plants to be effective, but at the risk of overkill, my version uses them all:
1. Common Plantain Leaves (Plantago major)
Common Plantain has nothing to do with the banana plantains you see in stores. It has tough ovoid leaves with distinctive veins and grows in a basal rosette. Tiny flowers form on a stalk.
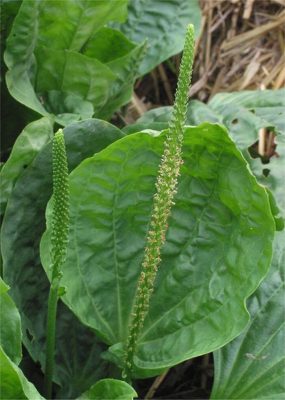
Once a mainstay in native Indian medicine, homeowners from California to Maine now work all spring and summer trying to vanquish this powerful healing plant from their yards.


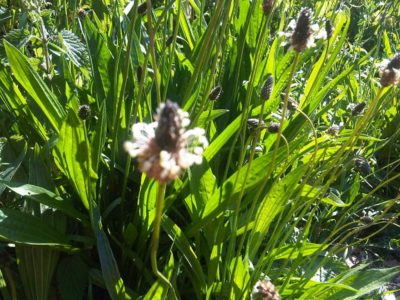
It is very similar to the common broadleaf variety, except the leaves are lanceolate instead of ovoid.
2. Narrowleaf Plantain Leaves (Plantago lanceolata)
This cousin of the broadleaf plantain has tough, lance-shaped leaves that grow in a basal rosette near disturbed lots, roadsides, and lawns.

3. Ground Ivy Leaves (Glechoma hederacea)
Ground Ivy is a creeping plant with scalloped leaves and small blue flowers. All parts smell minty when crushed.

The stem is square, not round, and leaves are alternate, meaning the leaf pairs appear in a staggered pattern along the stem.

4. Wood Sorrel Leaves (Oxalis)
Usually mistaken as clovers, wood sorrel leaves have a shamrock-like appearance.
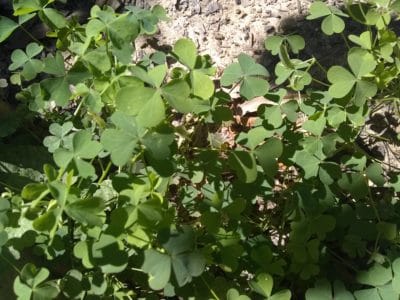
The flowers are small and can be either white, yellow, pink, or purple.

5. Red and White Clover Flowers (Trifolium pratense/Trifolium repens)
For most newbie foragers, this common weed is as easy to identify as a dandelion. The flowers have been prized for centuries for their medicinal qualities.


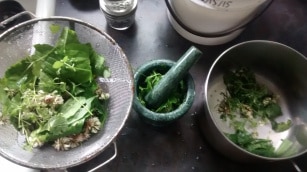
Step 1: Gather and Crush the Plants
I used about two cups’ worth of total plant material for a liter or so of salve, using approximately equal amounts of each plant with the exception of wood sorrel, which I only used a very small amount of.
You can make a smaller recipe and the amount of plant matter doesn’t have to be precise, just err on the side of too much to ensure your formula is potent enough. Once they are gathered, use a colander to rinse them thoroughly.
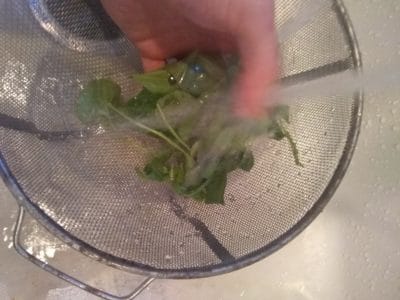
Then use a mortar and pestle or other technique to crush them slightly, just enough so that those membranes are broken and the leaves release a bit of juice.
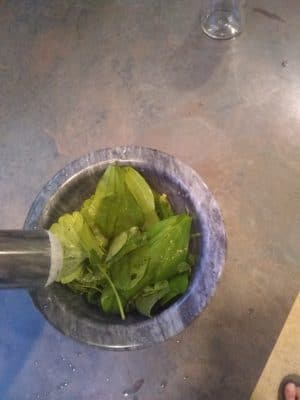
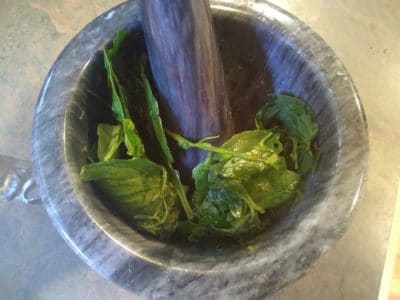
Then I put them into a pot with the coconut oil.
Step 2: Patiently Simmer
Melt the coconut oil at extremely low heat, and make sure you’ve used enough oil that the plant matter is submerged once it melts. Now all you do is simmer, simmer, simmer.
I left mine on for about three hours, but it might be better to leave it on even longer to ease out more of those active chemicals from the plants. The oil should turn a nice green color.

After a few hours or more of simmering, strain the liquid out. There may be some plant matter that finds its way through, which is fine. I didn’t have cheese cloth, but it would have helped to keep some of that extra plant material out of my final product. I like to really try to squeeze the plants to get out as much of the oil as I can.
Step 3: Cool Down
Now just let it cool for about 24 hours. It should keep fresh for a long time – I’d say up to a year or longer in the fridge.
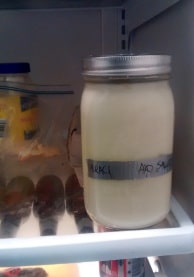
If you’re going to refrigerate yours, just rub your fingers on the salve until the warmth from the friction softens it enough to be applied.
Wild plant-based healing salve is cheaper, fun to make, and is even stronger and more effective (in my experience) than the myriad over-the-counter products it replaces. See what plants you find in your yard, and make a salve that renders store-bought first aid ointments obsolete!
Author Bio: Eric is a nature-loving writer, experience junkie, and former Boy Scout who never forgot that time-honored Scout Motto: Be prepared. Aside from camping and survival, he loves writing about travel, history, and anything he finds strange and unique!
If you enjoyed this article, consider following our Facebook page.
The Final Word
You have not heard the last of this. In addition to this DIY Miracle Healing Salve, I have made batches of Tea Tree Skin Ointment and Lemon Salve. These are themes of the basic formula that were put together to take advantage of the specific properties of oils used in their formulation. I am also experimenting with an infusions of dried oregano and olive oil.
As with all things at Backdoor Survival, I am testing first posting later. Stay tuned!
Enjoy your next adventure through common sense and thoughtful preparation!
Gaye
If you enjoyed this article, consider subscribing to email updates. When you do, you will receive a free, downloadable copy of my e-Book, The Emergency Food Buyer’s Guide.
You can also vote for Backdoor Survival daily at Top Prepper Websites!

Bargain Bin: Here are some links to items used to create your custom-crafted Miracle Healing Salve.
White Plastic Jar with Dome Lid 2 Oz (12 Per Bag): I often chose to use these small ointment jars rather than Mason jars for my salve. I also have similar jars in the 1 ounce size.
Ball Jar Crystal Jelly Jars with Lids and Bands, Quilted, 4-Ounce, Set of 12: Sometimes I use plastic and sometimes I use mason jars. Honestly? It is a matter of personal preference.
Beeswax Organic Pastilles, Yellow, 100% Pure 16 Oz: I ordered the white pastilles but have since learned that the natural yellow pastilles are better. That said, the difference may not be discernable – just be sure that what you purchase is cosmetic grade.
Glass Droppers, Pack of 6: I bought a package of these and loved them. When I went to re-order, I accidentally ordered plastic instead glass droppers. Learn from my mistake. The price is the same go get the glass ones.
Spark Naturals Essential Oils: These is what you need for the Miracle Salve: Lavender essential oil, Rosemary essential oil, and Peppermint essential oil. Enjoy a 10% discount on your Spark Naturals order with code BACKDOORSURVIVAL at checkout.
NOW Foods Essential Oils : My salves were made using essential oils from Spark Naturals. My sniff test tells me they are stronger and more pure smelling. For healing purposes, I feel they are superior. On the other hand, NOW Foods has decent essential oils at a budget price: NOW Foods Rosemary Oil, NOW Foods Peppermint Oil and Now Foods Lavender Oil.
Coconut Oil: Coconut Oil from Tropical Traditions is my preferred coconut oil. I love it so much I purchased a 5 gallon tub. Really, I did! I find it very silky to work with and love the taste when used in cooking. Note that no refrigeration is required and although it solid at room temperature, it melts at 76 degrees. The Nutiva brand from Amazon or Costco works well too.

Kirkland Signature Extra Virgin Olive Oil, 2 Liters (Product of Italy): If you have a Costco close by, get it their. Otherwise, you can use this or any other quality extra virgin olive oil.
The Complete Book of Essential Oils and Aromatherapy: I first became interested in aromatherapy and essential oils in the early 90s which was before they really became mainstream. I read every book I could get my hands on and dabbled at creating synergy’s (a combination of two or more oils that create a chemical compound that is greater than the some of its individual components). My bible then, and even now, is this book.
~~~~~~~~~~~~~~~~~~~~~~~~~~~~~~
~~~~~~~~~~~~~~~~~~~~~~~~~~~~~~
Amazon has a feature called Shop Amazon – Most Wished For Items. This is an easy tool for finding products that people are ‘wishing” for and in this way you know what the top products are. All you need to do is select the category from the left hand side of the screen.
The Amazon Top Most Wished For and Best Selling Outdoor Items
Emergency Preparedness Items from Amazon.com
Shop Amazon Tactical – Great Selection of Optics, Knives, Cases, Equipment
Amazon Gift Cards
Help support Backdoor Survival. Purchases earn a small commission and for that I thank you!
~~~~~~~~~~~~~~~~~~~~~~~~~~~~~~


219 Responses to “DIY Miracle Healing Salve”
I have had acne breakouts my entire life and I am now what is considered “elderly”. I am beginning to think I may have Rosacea and am wondering if the Miracle salve might be beneficial for treating that skin condition. I have made and have been using the salve on my dry foot skin with excellent results. Any information you might have is sincerely appreciated!
For Rosacea, my first thought was to make up a salve with Frankincense, Geranium, and Lavender. You can also add a few drops of Frank and Geranium to the basic healing salve and see how it goes. Do not be afraid to experiment.
Hello Gaye!
I wanted to know if I can make this amazing salve into a cream without losing it’s effectiveness and healing effect? I do exfoliate pretty often and this would be perfect for using as a moisturizer for face and body.
Happy new year!
Dreama
One suggestion is to use 100% coconut oil and then whip the salve with a hand mixer until it is fluffy and cream like. This has really worked well for me.
On the other hand, I use it as-is as face and body moisturizer. After about a week, it is no longer greasy on the skin. I suppose this is because my skin has adapted but also, the olive oil and coconut oil have lots of healing qualities of their own and our skin just drinks them in. Amazing, really. I wish I understood the science a little better.
I’m a little confused, are you whipping just the coconut oil (100%) or the blend of coconut oil and olive oil to use as moisturizer? Which one is no longer greasy on your skin after a week or so? Curious for a few reasons… Also if it’s just the pure CO does whipping it make it stay a creamy consistency instead of hardening in the cooler weather or does it behave the same way as it does without being whipped when it comes to changing “room” temperatures? Thanks!
Whipping the coconut oil only version makes it very silky. It will still melt at temps over 76 degrees if you do not add beeswax. It does stay fluffy but yes, if cold enough it will harden. I have never tried whipping the coconut oil and olive oil version.
None of my salves are oily on my skin five minutes later.
The bottom line is that you just have to experiment. Your climate and your skin may react differently than mine. There are tons of variations and I am sure you can find one that works for you.
Hi Gaye, I love your stuff; thank you. Have you priced out what each of your 2-oz jars cost to make? I made 18 4-oz jars for a crafts fair and they came out to about $3.06 for each jar. I used organic coconut oil, organic EVOO, 10d lavender, 10d rosemary, 10d peppermint, 10d melaluca, and 10d jojoba oil. The reason I made 18 4-oz jars is because I found 18 4-oz jars at a thrift store for 20 cents each. I don’t know how to price these. Any input from you or your readers is welcome. Oh, by the way, I did give you credit on the flyer I am putting on the table next to the jars 🙂
First off, great score on the jars. I have started to use small mason jars myself but have had to pay full retail 🙂
I have seen similar salves sold for $24.95 for 4 ounces although that did include shipping. Amazon has some that run $6 an ounce and more. Because you should factor in your time, I would think $10 – $12 ????
When I make my next batch, I am going to determine my costs as well.
I have come to realize that my $6.00 per jar price is considerably lower than ‘what the market will bear’. I read a blog where someone made a similar salve (with only 3 oils, not 4) and sold them for $20. She said they sold like hot-cakes. I will be curious for your follow up comments when you do get around to pricing yours. Thanks for everything.
Marianne – Just to be clear, I meant pricing as in cost and not to sell. (Although my husband, Shelly, has been on my case to sell small jars for the longest time. Many readers have asked about it …)
we are talking about the same thing, exact price to make including everything from container, label, carrier oils, essential oils. Thanks for everything.
Great stuff! Takes most of the ichiness from mosquito bites away for me and I have no bumps 24 hours later where I used to have bumps for days. After I had some skin removal surgery, it served triple duty -the oiliness helps with ouchless bandaid removal if I smear some around the edges of the bandaid before removal; it also immediately soothes the red irritated regular skin from a “bandage hickey” where the edges have been getting pulled on by adhesive all day; and it helps retain moisture for the growth of new skin and is antibiotic on the healing wound itself. Mine has tea tree and a little ‘thieves’ oil in it extra, 3 drops per 2 oz jar each oil.
I don’t know what happened. I keep my house at 68-70F and used 5tbsp (tablespoons) of beeswax like you said. The stuff was VERY runny, and all my ingredients were organic.
What I did is grate another 1 3/4 cup beeswax, and melt it at a low heat. I poured all the balm out into another container and mixed it up. In the containers I used, i did put squeeze two vitamin e capsules into each one, and a couple more drops of oil to make sure it still smelled ok. Did that this morning and they set up just fine, but just to be sure, I put it in the fridge. Nothing is wrong with my beeswax, I just wonder if the original recipe doesn’t call for enough? Either way, I just tweaked it to make it work for me. More beeswax seems to be better for me.
Okay, now this is making sense. My recipe uses beeswax pastilles and not grated beeswax. My guess is that volume by weight is not the same. When I get back home, I will weigh out some of the beeswax pastilles (although I thought I had done so already for someone) so if a person is using grated beeswax, they can measure out the proper amount.
Thanks for letting me know.
Gaye, I just made this yesterday, and it still has hardly set up. It’s been almost 24 hours. I followed the recipe to the T. I am wondering if more beeswax should be added? It’s pretty liquid actually. I want to remelt it, but what about the oils that I added? will those be compromised?
I am very surprised that it did not set up. Two questions: what type of beeswax did you use and how hot is it in your home? My home is pretty cool so it sets up in about 6 hours. You could try putting a jar in the fridge to see if it sets up that way. My guess, however, is that something is up with beeswax.
I have successfully remelted my salves so I could add additional oils. Just remember to use low heat and take it slowly. I have also used the microwave, watching it closely. Once, however, I spilled the entire jar of liquid salve removing it from the microwave so I don’t do that anymore; what a mess!
As long as you do not boil the oils, they should be okay. Like I said, reheat the salve slowly on low heat in a pan of water. I don’t know the size of your jars but you could experiment with one jar to see what happens. After adding the extra wax, put it in the fridge and see if it begins to set. up okay.
I have made salves with 100% olive oil and they still set up so this is puzzling to me.
I completely forgot to add the vitamin e. What is the shelf life without it? I could remelt it, but I am worried that would affect the quality of the oils I put in.
I mostly leave out the vitamin E these days. I make small batches and use it up so quickly that there is no change of spoilage. In the heat of summer (and it is rarely that hot where I live), I store my spare jars in the fridge. Even so, I think that since I use a batch up within 3 months, there is problem.
I really do need to write an update to the article based upon current trial, errors, and new formulations over and beyond the basic healing salve (which is still my favorite).
Could you use arrowroot powder instead of the beeswax?
Pam – Sorry, I do not have any experience with arrowroot powder. Perhaps someone else knows the answer?
Gaye can you help me? I have serious pain in muscle and joints. Which salve do you recommend for me. I just bought the ingred. for the Miracle Healing Salve but you also have an Achy-Breaky Salve. Which one do I make?
Thank You for all the info. you put out!!!!
Cher
I had a dental emergency and am not at home where I have all of my recipes plus my big fat desk reference manual for essential oils. So, based on memory, what I would do is add 10 drops of Lemongrass to the basic healing salve (2 oz jar) or 20 drops to the 4 oz jar. Through trial and error, I have found that Lemongrass is a wonder-oil for muscle aches. (Plus it is one of the less expensive oils.)
If it is more of an arthritic pain (deep joint pain), I would use a combination of birch, geranium, and something else (lemongrass??) in roller ball mixed with FCO. Let me know and I will look up the exact recipe for you next week. FCO = Fractionated coconut oil.
Gaye, firstly gratz on your amazing site, and thank you too for you wealth of advice.
If I may, I’d like you try adding some Turmeric oil, to complete the ultimate miracle salve. Topical turmeric salves and ointments can help reduce localized inflammation caused be acne. It has anti-viral and anti-bacterial properties that help treat wounds and hasten healing, and preventing spread of infection. Turmeric and aloe vera combine to make a soothing paste for sunburned skin and even help with bruised skin. There are chemicals in turmeric that can decrease the swelling or inflammation and redness caused by various skin conditions including eczema.
So another great all rounder with amazing properties.
Dusty – I have seen some recipes for salves using turmeric that has been infused in olive oil. Is that what you suggest or do you use turmeric essential oil. The latter is a bit more difficult to source but doable.
I definitely want to give this a try an will report back on the results. The only problem is I don’t have anything at the moment that needs healing which is, I suppose, a good problem to have.
Did you ever get an answer to this or experiment yourself? Infuse olive oil or use essential oil (which I had no idea existed)? If infusing do you use Turmeric powder or whole Turmeric root for the infusion? Thanks Loving all of this info!