
This site contains affiliate links. As an Amazon Associate, I earn a commission from qualifying purchases at no extra cost to you. Full Disclosure Here.
Whether or not you currently have a food garden, practical wisdom says you should stash away some heirloom seeds for the long term.
If the time ever came when food was in short supply or overly expensive, your stored seeds could become a lifeline. Stored seeds could be used in your own garden, in a community garden, or even as tender in a barter situation.
This raises the question: what is the best way to store seeds for the long term? This question is especially timely for me since I have a number of new, unused seed packets that need to be packed away somewhere besides my desk drawer.

Today I have gathered a few options for you. In addition, I am giving you the option to create your own heirloom seed bank using seeds from the Survival Seed Vault.
Also Read: Food Storage Ideas for Preppers
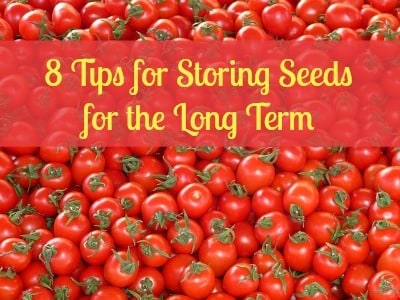
Storing Seeds for the Long Term
During my own research, I learned that storing seeds is not unlike storing food. The enemies of seeds are similar: heat, light, and humidity. Some sources also indicate that oxygen is a problem with seed storage.
Here are some tips for storing your seeds:
1. Keep seeds at a cool to cold temperature of 40 degrees or less.
2. Avoid fluctuations in temperature such as a garage or storeroom that is cold in winter but blazing hot in summer.
3. Avoid light and never store seeds in direct sunlight or a well-lit room.
4. Keep your seeds in moisture-proof containers. A Mylar bag or mason jar is perfect as is a food saver bag. Even a standard Ziploc bag will work if you take care to squeeze out all of the air first. If you are unsure of the moisture level, check your bag after a day of storage and see how your seeds look. Better to be safe than ruining all your leftover seeds for planting next year.
5. Storing your seeds with a desiccant (silica gel) or oxygen absorber may prolong their life.
6. As with your food stores, rotate seeds every few years. This is not 100% necessary but if you are gardening anyway, why not rotate?
7. When you are ready to use your seeds, keep them in their closed storage container until the seeds come to room temperature. This will prevent unwanted condensation from settling on the seed packets.
8. To store your own saved seeds, spread them out, and allow them to air dry. Once you are done drying seeds, put them in envelopes or even repurposed medicine bottles, and label them. You can then store them in your refrigerator or freezer just like store-bought seeds.
The Germination Test
Something that you may want to do before planting saved seeds is perform a germination test. This will help you determine how viable they are. So, for example, if you determine that they are 60% viable, you can start 40% more than you would normally start to come up with the requisite number of plants.
A common method to test the germination rate is to take a paper towel and dampen it nearly to soaking. Count out 10 seeds, place them on the paper towel, then carefully fold it to fit into a plastic bag. Place your bundle in a warm spot on your kitchen counter, making sure that the bag remains open slightly to allow a little air to enter it.
Check frequently and when the seeds have sprouted, determine the germination rate. Hint: 8 seeds out of 10 is 80%.
A Word About Seeds
For years, seeds have been scientifically manipulated in such a way that they could not be successfully saved and remain true to form. This was good for the seed companies but bad for people.
Thankfully, there are a number of sources where you can obtain non-GMO seeds (not genetically modified) and non-hybrid seeds. These non-GMO, non-hybrid seeds are the ones you are going to want to save for your DIY survival vegetable seed bank.
Create Your Own DIY Survival Seed Bank
One of the best ways to accumulate seeds for the long term is to purchase a few packets of seeds monthly over time. You know how I like to do things One Month at a Time, right?
To help you get started, you can check out options like the Survival Seed Vault packages here.
Once a month, you are sent packets of seeds. These seeds are fresh and can be used in your garden now or saved for the long term.
I asked Mike a few questions:
1. Are the seeds you send out growing-zone specific? In other words, if someone lives in zone 8, they will be sent seeds that will grow in that particular zone?
Yes the seeds are zone specific with an occasional variety thrown in to stretch your gardening knowledge.
2. I see that the seed packets have a month printed on them. What does that mean?
The month in the upper right corner is the month the seeds are mailed. It has nothing to do with planting.
3. Are seeds available 12 months out of the year? If so, how does that work for climates that are buried in snow and ice during the winter months?
Yes the seeds are sent all 12 months out of the year. That does not necessarily mean you can plant them all 12 months. Simply store your seeds in a cool dry location and they will be good to go when gardening season rolls around. When you store your seeds properly they can easily last 5 or more years.
4. Is there anything else you would like to share with Backdoor Survival readers?
All seeds are heirloom varieties and non-GMO. In addition, we have an FAQ at //averagepersongardening.com/seedsclub/faq.php which answers the most popular questions that we receive.
The Final Word
Gardening is a valuable skill that every prepper worth his or her salt should learn. I know that I have had my own challenges in this area but I still try, even though I only do so on a modest basis.
Still, I make it a point to collect seed packets (check out this link to buy) and store them for the long term, properly sealed in my freezer. You should never know when they may become handy for food-growing or barter purposes.
Enjoy your next adventure through common sense and thoughtful preparation!
Gaye
Click Here To Vote For BDS at Top Prepper Websites! Did you know you can vote daily?
If you have not done so already, please be sure to like Facebook which is updated every time there is an awesome new article, news byte, or link to a free survival, prepping, or homesteading book on Amazon. You can also follow Backdoor Survival on Twitter, Pinterest, and Google+ and purchase my book, The Prepper’s Guide to Food Storage from Amazon.
Bargain Bin: Today I share some tools and supplies for using a FoodSaver to vacuum can your emergency food. And in case you missed it, read How to Use a FoodSaver for Vacuum Canning.
FoodSaver Vacuum Sealer: As long as the unit has an accessory port (and this one does), and inexpensive FoodSaver will work just as well as the fancier models. That is my two cents, at least.
FoodSaver Wide Mouth Jar Sealer: Already have a FoodSaver? If so, check out this jar sealer which can be used to vacuum seal your Mason jars. This is a great option for short to mid-term storage of items such as beans, rice, sugar, and salt. Store your jars in a cool, dark place, and you are set with the added advantage of removing a small amount for current use without having to disrupt your large Mylar bag or bucket of food. There is also a version for regular sized jars.
FoodSaver Accessory Hose: Most FoodSavers come packaged with an accessory hose. If yours is lost or damaged, be sure to purchase a host to use with your Jar Sealer.
100-Pack Oxygen Absorbers, 100cc: I always have these available. At less than 10 cents each, I consider adding a 100 cc oxygen absorber cheap insurance that ensures that my vacuum-sealed food will remain nice and fresh – even five years later.
Mylar bags & Oxygen Absorbers: What I love about Mylar bags and oxygen absorbers is they protect against every single one of the food storage enemies. Prices do vary but for the most part, they are inexpensive and easy to keep on hand. And while you can seal them up with a FoodSaver, some tubing, and a common clothes iron, I find it infinitely easier with a cheap hair straightening iron that you can pick up for very cheap.
Mylar Zip Seal Food Storage Bags: These are the zip seal bags that I used to package up my spices, herbs, and butter powder. These are extra heavy, 5 mil bags. I found that the zip feature made packaging extra easy although I still seal the bags with my hair iron.
Sharpie Permanent Markers: Sharpies were invented for preppers! And without question, Amazon is the cheapest place to buy them.
~~~~~
~~~~~


121 Responses to “How To Store Seeds for the Long Term”
My tip is to make your own compost to garden organically.
Do this by collecting weeds from your own unfertilized
Garden, your own yard and leaves from your own trees.
Shredded if possible. Put all this material in a compost
Bin of your own making (many styles and varieties of
Designs are available on the internet and in the public
Library). Turn the material over regularly to promote
Faster composting. Using your own compost will help
To speed your garden toward becoming totally organic
Which will be extremely beneficial when and if the SHTF.
I have ALWAYS been told to never, never put weeds and diseased leaves in your compost. Most weeds will take over the garden (again) and the diseased leaves will cause your plants to become diseased also.
Actually the new consensus is that composting ‘weeds’ is actually very beneficial. If you are composting hot enough, you’ll kill any seeds and disease. And if you cut the weeds before they set seeds, that’s not a problem. Weeds mine valuable minerals from the soil and hold those in their leaves and roots. By composting them, those elements then become available to your garden. Just like nature, everything has a value and purpose in the garden!
Just don’t allow weeds to flower. No flower no seeds
If at all siblings using manure to fertilize your garden soil Is a big plus along with compost. If you don’t have access to cow manure you can also use chicken manure as a great substitute. I have six chickens in my backyard fence stuff right next to my garden area and the bonus is I get plenty of fresh eggs and all the chicken manure I desire and it works excellent as a fertilizer
A good tip to use if you are thinking of adding your weeds to a compost pile is to first cover the area with the weeds with a tarp and keep covered until all the weeds underneath the tarp have died and dried out. The heat from the sun hitting the tarp And the lack of any water will dry out and kill the weeds very quickly making it a much easier task overall. This method also has the added benefit of being completely natural and free of using dangerous chemicals that can contaminate your compost. Make sure to use an even mixture of nitrogen rich and carbon rich material. Too much of either one can create problems when it’s time to use in the garden with certain plants.
Egg shells around my basil plants keep the slugs away. Also coffee grounds work great for your acid loving flowers like azelias, and literally saved my Avocado tree. I have very alkaline soil so I put coffee grounds and purified water on the avocado tree and voila! It went from dying to looking amazingly healthy.
If you put cut up banana peels and those used coffee grounds around your roses, they will LOVE it. 🙂
My tip is to spend a little time every day in the garden. If you go out there everyday you can stay on top of the weed and bug problems we are forever fighting. Plus it is a nice way to relax and unwind a bit from the daily stresses.
I live in Colorado with 6% humidity and intense sunshine. To successfully grow a garden here, you must water, water and water. Much more often than you might think.
I’m in Colorado also, plenty of water and protection from hail are critical for gardening here. My biggest worry is that if things get really bad, finding water is going to be a major issue.
When I got back into gardening about 8 years ago my cousin Jane suggested I keep the daily newspaper to use around the plants. I took her advice and made a 2 layer barrier between the soil and the air. It keeps the weeds at bay long enough for the plants to get established and usually lasts most of the season. It also retains moisture for the plants. The paper rots and when the garden gets its final tilling in the fall the newspaper has disappeared. I was a little skeptical at first when Jane told me how she used the newspapers. But she explained that she had researched the ink that is now used for our local newspaper and found that it is made from a soybean base, and that it is non-toxic to plants and animals. Knowing how particular she is about her garden I had no further qualms about using the newspaper. It works wonderfully and it is a great way to recycle the newspaper. Happy Gardening. 🙂
have your kids learn gardening while young i watched but never did gardening now i wish i had it is harder than it looks
I am new at gardening and the one tip I have been told is to put crushed egg shells in when you plant your tomato plants. I plan on doing that this week when my plants go in.
We just planted our second attempt at a garden. Our first attempt, last year, was taken over by grasshoppers. So far, I don’t have any favorite tips, though I would love a tip for how to get rid of grasshoppers!
Mix: a tablespoon of Tabasco, 1/3C baby shampoo, 1TBS peppermint oil and 1/2 C tobacco juice (soak cheeing tobacco on water until the water turns dark tea color),in a Gallon of warm water, put it in 1Qt in a 20 gal/min hose end sprayer and spray your plants every week. They may lose interest!
Chewing tobacco!
Re: suggestion to use tobacco juice to repel pests. DON’T RECOMMEND THIS unless you know your specific plants requirements. Many plants can be killed by the tiniest contact with tobacco (TMV tobacco mosaic virus for example).
TMV is present in cigarettes not just tobacco plants. There is no effective pesticide (plus who wants pesticides in your garden anyway), and worse, it is so hard to kill, and easy to transfer, that a smoker can transfer to a plant if they don’t wash their hands before plant handling.
It can affect plants quickly or slowly, and can live in the soil, on tools, clothing, etc. It affects tomatoes (hence the hybridized tomatoes that have VFT resistant labels (T is for this virus) but remember, those plants’ seeds cannot be stored for planting as they are not true to the original. It also can affect potato, eggplant, rose, zinnia for just a few examples.
I have a two step system I use for all pests.
Step 1: after I brew my coffee I run an extra pitcher of water through – it makes a weak coffee, then I put that in a pit on the stove with some orange peels and mint leaves (& sometimes garlic), boil and then simmer for a bit, when it is cool I pour it into gallon jugs (I use milk jugs). When I am ready to use this I pour it into a heavy duty spray bottle and add a couple drops of dish soap.
Step 2: I save my egg shells and coffee grounds. Once I have a bit saved up I grind them together in equal amounts in a coffee grinder. If you don’t use enough eggs you can use Diatomaceous Earth.
When I am ready to use I spray the plants with the spray and then sprinkle the ground egg shells.
Flying things like moths & aphids don’t like the odor of the spray, things with an exoskeleton (grasshoppers, earwigs, rollie pollies, etc) will get the gritty stuff in between their plates and it will cut them up internally and they will die.
In addition everything in this is good for your plants, all natural, and you can make it at home.
One possibility you might want to try if the area you live in permits it is to get yourself some chickens. They will help fertilizer soil and eat those pesky bugs. Plus you get the added benefit of all those free eggs. I live in a well populated city in salt lake city Utah in West Jordan and I have six chickens next to my garden and they provide me with lots and lots of eggs and all the free chicken droppings I desire for the use of fertilizing my soil. It works just as good as Cow manure in my opinion without the smell.
My favorite gardening tip? Don’t take gardening advice from me! 🙂 I always describe myself as having a black thumb because I can kill any living plants! I keep trying to garden though, hoping one day, I will have a breakthrough. I suppose my best tip is to make sure to water your garden everyday. I think that’s my downfall! Thanks for the chance to win!
Mulch, mulch and mulch some more to stop pesky weeds from taking over your garden,ellen prosser